Validation
A validation template enables users to test data formats, lengths, value ranges, pattern matching, and complex business logic within a given dataset. It can be applied at multiple points within the data pipeline, including incoming feed files, staging tables, dimension tables, APIs, and other data sources. It allows users to thoroughly validate a single data source and can be applied to the following use cases:
Use Cases
- Data Ingestion Validation: Validation templates can be leveraged at the point of data ingestion into an ETL process to ensure the incoming data adheres to predefined formats and business rules. This prevents dirty data from propagating through the pipeline.
- Data Warehouse Validation: These templates can be applied to data residing in the data warehouse to validate data completeness, enforce referential integrity, check for duplicates, validate conformance to standard patterns (e.g., email, phone numbers), and ensure historical consistency.
- Data Quality Monitoring: Validation templates play a key role in ongoing data quality validation, allowing automated checks across all the dimensions of data quality. This helps in continuously monitoring the health of the data assets and identifying quality issues proactively.
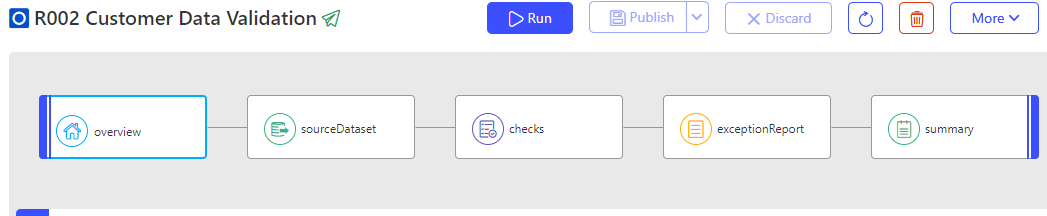
Components
There are five (5) different components in a Validation Rule:
- Overview: To provide rule related metadata.
- Source Dataset: To provide source connection details required to fetch the dataset.
- Checks: To provide the conditions for testing the datasets.
- Exception Report: To provide the conditions for viewing and evaluating data mismatches.
- Summary: To provide variables that are attached to rule execution instance event.
Overview
This component allows users to define rules and configure advanced options for parameterization. Below are the details for the fields included in the rule definition:
| Field | Description | Purpose |
|---|---|---|
| Rule Name (Mandatory) | The unique name of the rule within a folder. It should be descriptive enough to help users quickly identify and understand the purpose of the rule. | Serves as the primary identifier for the rule. Ensures clarity and uniqueness within the folder structure. |
| Rule Code (Optional) | An alphanumeric shorthand or technical identifier for the rule. This field is optional but highly useful for efficient management and organization of rules. | Helps users search, filter, or differentiate between similar rules. Provides a compact reference for integrations, automation, or workflows. |
| Description (Optional) | A concise explanation of the rule. This field offers additional technical or business context to enhance understanding. | Clarifies the rule's intent or scope for users. Assists in onboarding new team members or providing documentation for audits. |
| Purpose (Optional) | A short summary describing the purpose or intended outcome of the rule. This field provides context for why the rule was created. | Highlights the business or technical objective of the rule. Helps users understand its significance and expected impact. |
| Criticality (Mandatory) | The Criticality field indicates the severity level of an issue. This is a mandatory field that helps categorize and prioritize errors based on their impact. The field provides the following options: Warning (Default): The issue should be reviewed but does not require immediate action. Critical: The issue needs to be resolved promptly; however, testing can continue despite its presence. Blocker: The issue must be resolved before testing can proceed, as it prevents further progress. | Ensures a clear understanding of the issue's severity, enabling teams to prioritize effectively and maintain workflow efficiency. |
Advance Settings
| Field | Description | Purpose |
|---|---|---|
| Parameter (Optional) | This field specifies the default parameter file associated with the rule. | Enables parameterization of the rule by referencing keys in the parameter file in SQL, checks, etc. |
Source Dataset
This section allows users to configure the source settings to extract data for processing. The following fields and options are available:
- Connection Type: This field allows users to select the type of data source (application, database, file ...) they want to connect to. Selecting the appropriate connection type ensures that only relevant connections are displayed for further selection.
- Connection: This field displays a list of connections available for the selected connection type. Once selected a user can:
- Test the connection using the ✔️ Checkmark Icon.
- Edit the connection details using the ✏️ Edit Icon.
- Refresh the list of connections using the 🔄 Refresh Icon.
- Methods for reading data from the data source
- Default: This option allows users to browse and select the required Schema and Table/View from the chosen connection. It is Ideal for users who prefer navigating schemas and tables visually without writing SQL.
- SQL: This option allows users to manually input custom SQL queries to retrieve specific data from the selected connection.It provides flexibility for advanced users to query data directly, offering precise control over the data extraction process.
- Preview Data: Clicking the Preview Data button allows users to view a sample of the data retrieved based on the selected table (Default) or SQL query.
Checks
Checks are used to validate format, patterns, ranges, or any other test conditions involving attributes from the source dataset. Here is the list of Out Of Box Checks and how to add Custom Check.
Currently all rules supports Groovy expression language for writing test conditions in Custom Check. You can use any Groovy, Java, or user-defined functions when writing these expressions.
Exception Report
This component is for configuration of exception report display, storage and export formats. Below are the different properties available in this component.
| Property | Description | Note |
|---|---|---|
| Export File Format | Specifies the default export format. Options include Excel or CSV. | |
| Store Failure & Errors Only | When enabled, only failed records are stored in the report. | This property is enabled by default. |
| Store Exported File Only | Deletes the raw exception report and retains only the exported file. | |
| Show Download Exception URL | Displays a download link for the exception report. | |
| Store Only # Rows | Limits the number of records stored in the report to the specified count. |
Summary
Users can configure result in override as well as attach custom variables to the Rule execution event.
Exit Code
The exit code of a Rule execution indicates whether the Rule succeeded, failed, or encountered an error. It represents the count where one or more checks failed (evaluated to false).
| Exit Code | Status | Note |
|---|---|---|
| == 0 | Success | This indicates that the rules executed were successful with all records. |
| > 0 | Failure (Warning/ Critical/ Blocker) | This indicates that the rules executed failed with few or all records. |
| < 0 | Error | This indicates that the rule itself encountered an error during execution. Every negative Exit Code code has its own significance. In case of error, revisit the rule, input records or check the product health to figure out the issue. Or, contact iceDQ Support. |
An Exit Code is the total number of rows for which 1 or more checks evaluated to false or identified a data issue.
Scenarios
Following scenarios will help you understand how the Exit Code of a Validation Rule is calculated.
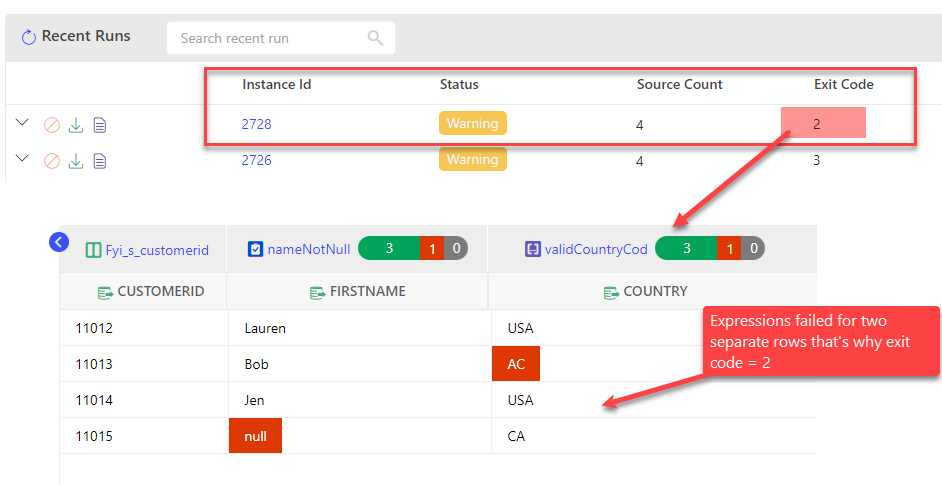
Scenario #1
In this example the Exit Code will be 2 as two rows have data issues for two different checks.
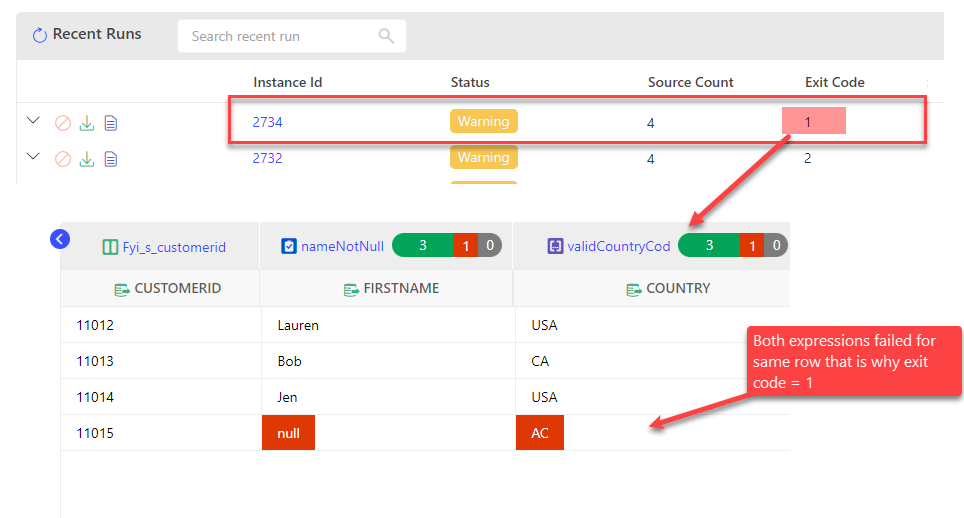
Scenario #2
In this example the Exit Code will be 1 as only 1 row has data issues for two different checks.
How To: Create a Validation Rule
This video shows you how to create a validation rule against customer data.
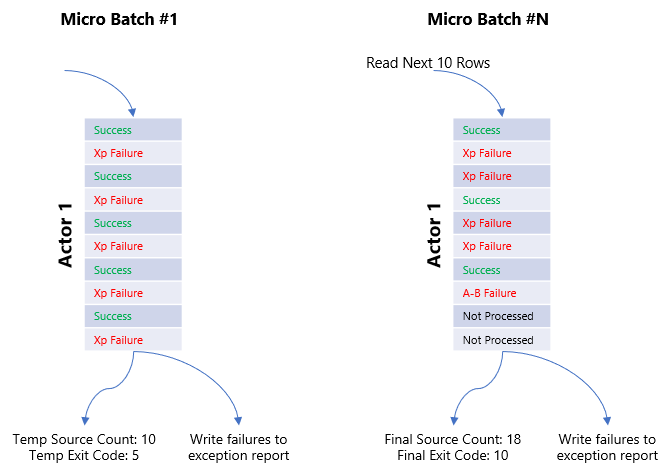
Understanding the Engine Behaviour
Below is the behaviour of the engine when executing a Validation Rule.
- Connect to the source and read the data in-memory in micro-batches (e.g. 10k rows/ batch) that needs to be validated
- Evaluate each check (test condition) created in the Rule
- Calculate the number of rows processed and issue identified
- Write the data issues to an exception report
- Repeat step 2-4 till all the data has been evaluated
- Complete the execution and submit the results
Considerations
- Always use an alias when writing complex SQL and avoid using spaces and special characters in the name.
- Add a column as Source Check if it's not part of any expression but the user would like to see it in the report.
- Only Underscore (_) and Hyphen (-) special characters are allowed in the rule Name.
- Always use Stop at Error and Store Failure/ Error properties when validating high volume data.
- Update the column names in Checks if it changes in Source dataset.