Workflows
A Workflow in iceDQ is a defined sequence of instructions or commands on how to execute rules and report the status of each step during Regression Testing or Release Testing. It is designed to accomplish specific tasks through a controlled, repeatable process. The purpose of creating a workflow is to automate and streamline the rule execution process. It ensures that testing activities are carried out consistently, with the ability to respond dynamically based on test outcomes or changing requirements.
Key Features
- Sequential Execution: Execute rules in a defined sequence to maintain order and logical flow.
- Conditional Execution Control: Optionally stop the execution of subsequent rules based on the result or status of a previously executed rule.
- Dynamic Rule Selection: Flexibly to decide which rules to run depending on test conditions
- Environment Switching: Repoint rules to run against different environments or connections without modifying the rule logic.
- Parameter Overrides: Override default rule parameters (e.g., input files or configurations) to suit specific testing needs.
Use Cases
Workflows are designed to support a variety of testing and data validation scenarios. Below are some common use cases:
- Pre/Post Processing for Rules: Script rules can be used for pre-processing (e.g., data setup) and post-processing (e.g., cleanup or logging). Workflows allow execution of these script rules in sequence with the actual validation rules, ensuring a complete and structured test cycle.
- Testing Data Pipelines: Rules can be arranged in the same sequence as the actual data pipeline stages (e.g., ingestion → transformation → loading). This enables realistic simulation and validation of the entire pipeline within a single workflow.
- Environment-Wide Testing: All rules associated with a specific environment (e.g., development, staging, or production) can be grouped and executed as one workflow, allowing for full environment validation in one go.
Components
Workflows consist of two primary components:
1. Overview: Provides metadata and general configuration details for the workflow.
2. Rules: Defines the rules to be executed within the workflow, including their order and conditions.
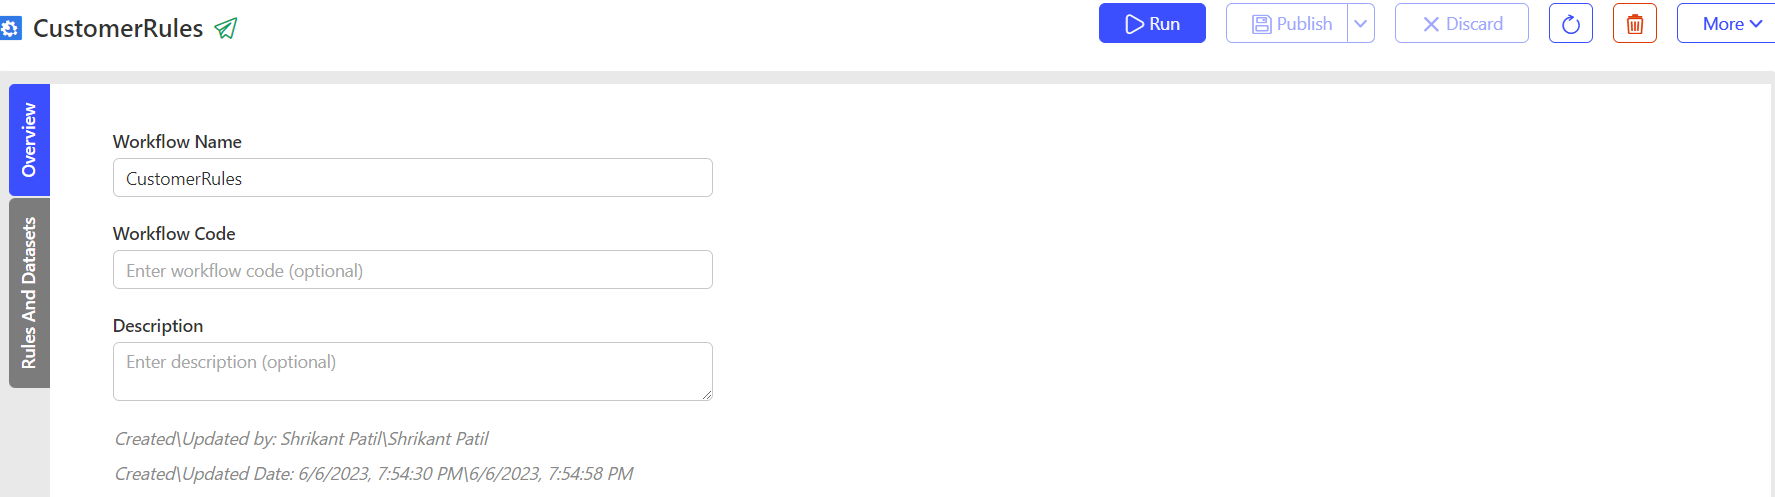
Overview
The Overview component allows users to define and describe the workflow. The following fields are included:
| Field | Description | Purpose |
|---|---|---|
| Workflow Name (Mandatory) | The unique name of the workflow within a folder. It should be descriptive enough to help users quickly identify and understand the purpose of the workflow. | Serves as the primary identifier for the workflow. Ensures clarity and uniqueness within the folder structure. |
| Workflow Code (Optional) | An alphanumeric shorthand or technical identifier for the workflow. This field is optional but highly useful for efficient management and organization of workflows. | Helps users search, filter, or differentiate between similar workflows. Provides a compact reference for integrations, automation, or workflows. |
| Workflow Description (Optional) | A concise explanation of the workflow. This field offers additional technical or business context to enhance understanding. | Clarifies the workflow's intent or scope for users. Assists in onboarding new team members or providing documentation for audits. |
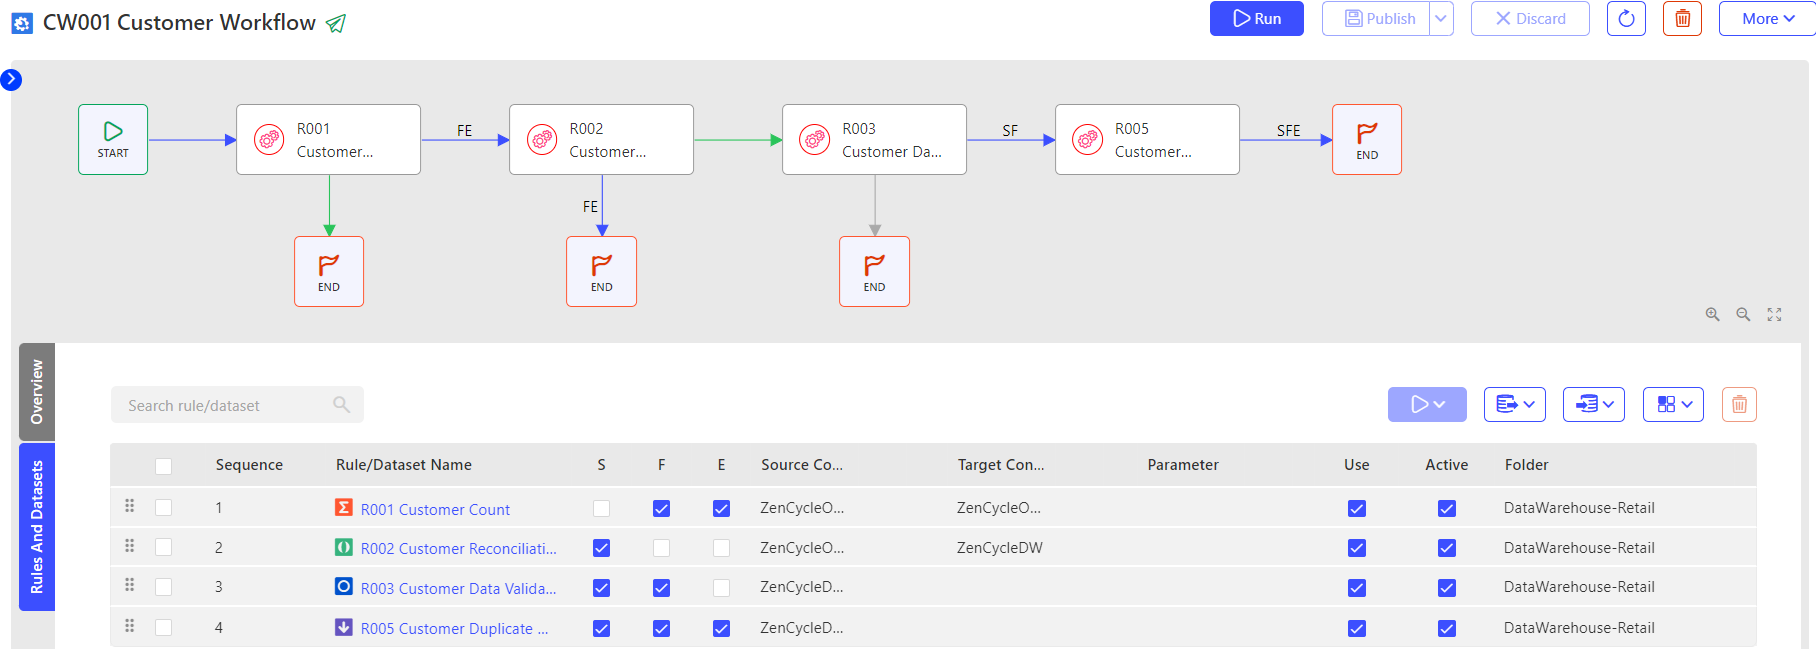
Rules
The Rules component enables the addition, arrangement, and configuration of rules within the workflow.
To create the workflow:
- Add the rules: The page displays all the folders and rules present in the workspace. User can select the rules to add to the workflow using
 option. Following options are available:
- Filter: Narrow down the rule list by selecting specific folders using the ✔️ Checkmark Icon.
- Search: Use the search bar to locate rules by name or keyword.
- New Rule: Create a new rule directly from the interface using the
 button.
 - Add Rule: Add the selected rule(s) to the workflow using the button.
- Arrange the sequence: Be default the rules are arranged sequentially in order they were selected in step one. To rearrange the sequence:
a. Select the rule tab.
b. Use the button on each rule to drag and drop it to the desired position.
 - Each rule within a workflow supports the following configurable options. Select for each rule:
- SFE: Allows the user to define rule-level dependencies and determine whether the workflow execution should continue or halt based on the result of the current rule instance.Useful for enforcing conditional execution.
- Active: Enables or disables the execution of a specific rule within the workflow. Provides flexibility to temporarily exclude rules from execution without removing them from the workflow.
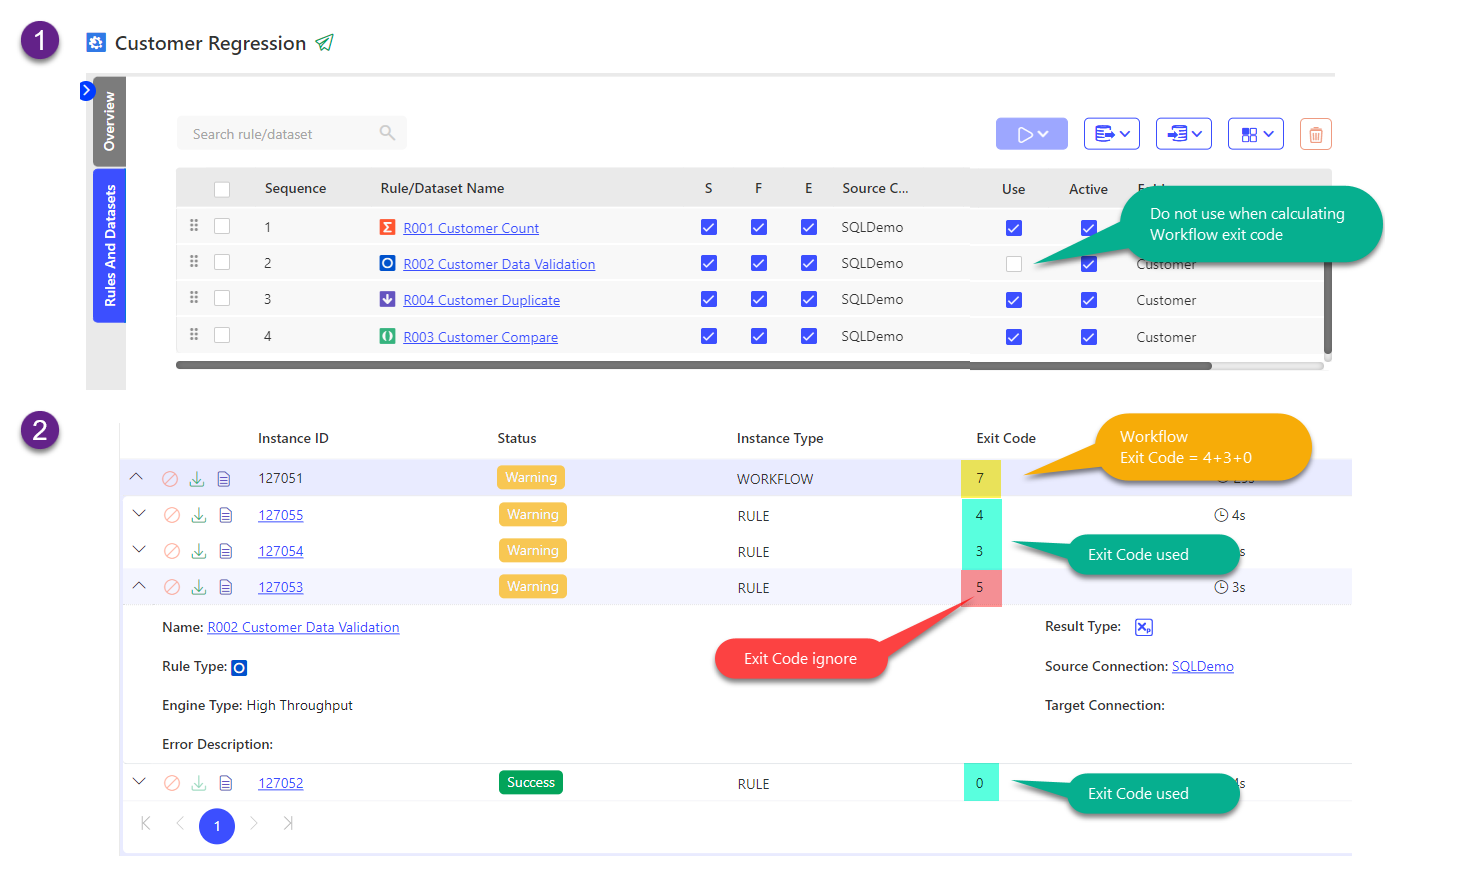
- Use: Determines whether the rule's exit code should be considered when evaluating the overall exit code of the workflow. It ensures only relevant rules contribute to the workflow’s final status.
Following table explains how the Workflow execution is impacted by enabling or disabling each property.
| Property | Checked (Default) | Unchecked |
|---|---|---|
| S (On Success) | The workflow will continue to execute if the rule outcome is a Success. | The workflow will stop to execute if the rule outcome is a Success. |
| F (On Failure) | The workflow will continue to execute if the rule outcome is a Failure. | The workflow will stop to execute if the rule outcome is a Failure. |
| E (On Error) | The workflow will continue to execute if the rule outcome is a Error. | The workflow will stop to execute if the rule outcome is a Error. |
| Active | The workflow will execute this rule. | The workflow will not execute this rule. |
| Use | The workflow exit code will use this rules exit code for calculation. | The workflow exit code will not use this rules exit code for calculation. |
-
Override Connections and Parameters
a. Override source connection
To override source connection:
i. Select button.
ii. In the Find Connection text select the connection name to override.
iii. In the Override Connection text select the connection name to override with.
iv. Select:
Replace Source Connection - To save changes.
Reset button - To reset the values selected.
Cancel button - To cancel without saving.
v. Repeat the process for all source connections to override.b. Override target connection
To override target connection:
i. Select button.
ii. In the Find Connection text select the connection name to override.
iii. In the Override Connection text select the connection name to override with.
iv. Select:
Replace Source Connection - To save changes.
Reset button - To reset the values selected.
Cancel button - To cancel without saving.
v. Repeat the process for all target connections to override.c. Override parameter file
To override parameter file:
i. Select button.
ii. In the Find Parameter text select the parameter file name to override.
iii. In the Override Parameter text select the parameter file name to override with.
iv. Select:
Replace Source Connection - To save changes.
Reset button - To reset the values selected.
Cancel button - To cancel without saving.
v. Repeat the process for all parameter to override. -
Delete Rule: Optionally if one or more rules need to be removed:
a. Select the rules. Use ✔️ Checkmark Icon.
b. Click the button.
How To: Create a Workflow
- From the main application menu, navigate to the Data Testing section.
- Within the Data Testing section, select the Workflows tab to view and manage workflows.
- Click on the New Workflow button to initiate the creation of a new workflow.
- Configuring Workflow Settings:
- Folder: To search for and select the appropriate workspace folder where the workflow will be stored.
- Workflow Name: Enter a descriptive and unique name to identify the workflow within the selected folder.
- Template: Select the Custom Template option.
- Cancel: Select this option to exit the workflow creation process without saving changes.
- Create the workflow. Construct the workflow using the available components described in the above section.
- After configuring and building the workflow, click on Publish to save and activate it.
The video illustrates how users can create a custom workflow in a folder, execute it and view the execution instances.
Exit Code
The Workflow Exit Code is the sum of the exit codes of all the Rules (sequences) where the "Use" property is selected.
Other Actions
Once the configuration is complete, users have following options:
| Field Name | Description |
|---|---|
| Discard Workflow | This option is available throughout the process until the Publish option is hit. During the initial creation, if discard is pressed, the entire workflow will be discarded. Once the workflow is published and then any changes are made, discard will roll back only the changes made during the last edit. |
| Publish | Once the workflow is configuration is complete, the publish option commits the workflow created. |
| Run | Once the workflow is published, the Run option will activate. This option will actually execute the workflow and show the result. |
| Recent Runs | Will highlight the box that displays the recent runs. |
| Delete | Deletes the workflow. This option is activated once the workflow is published. |
| More > Duplicate | Duplicates the workflow. |
| More > Share | You can share the link to other users. |
| More > Deactivate/Activate | This option toggles between activation and deactivation of workflows. |
| Subscriptions | This option is used to send the email notification to selects users on test Success, test Failures and workflow execution Errors. |
How To: Configure Run Sequence & Dependency
The video illustrates how users can configure the properties and execute the workflow or workflow sequences.
How To: Override Connections & Parameters
The video illustrates how users can override source/target connections and parameters at the sequence level or in bulk at the workflow level.
How To: Copy a Workflow
- From the main application menu, navigate to the Data Testing section.
- Within the Data Testing section, select the Workflows tab to view and manage workflows.
- Select one or more workflows to be copied. Use ✔️ Checkmark Icon.
- Click on the More > Copy option to copy the workflow.
- Search and select the appropriate workspace folder where the workflow will be copied.
- Select Copy option.
- Cancel: Select this option to exit the workflow copy process without saving changes.
How To: Move a Workflow
- From the main application menu, navigate to the Data Testing section.
- Within the Data Testing section, select the Workflows tab to view and manage workflows.
- Select one or more workflows to be Moved. Use ✔️ Checkmark Icon.
- Click on the More > Move option to move the workflow.
- Search and select the appropriate workspace folder where the workflow will be moved.
- Select Move option.
- Cancel: Select this option to exit the workflow move process without saving changes.
How To: Delete a Workflow
- From the main application menu, navigate to the Data Testing section.
- Within the Data Testing section, select the Workflows tab to view and manage workflows.
- Select one or more workflows to be Deleted. Use ✔️ Checkmark Icon.
- Click on the More > Delete option to move the workflow.
- Select Delete option.
- Cancel: Select this option to exit the workflow move process without saving changes.
Considerations
- Workflow can only contain Rules from the Workspace that it belongs too.
- Only published rules are visible in Rules listing pane.
- If a rule exit code is less than 0 by default, the workflow exit code is -37.
- Execution of an inactive rule in the workflow is skipped. The exit code is 0, and status is displayed as SKIPPED.
- A minimum of 1 flag (Success, Failure or Error) needs to be selected.
- A minimum of 1 sequence in the Workflow should have Active property selected.
- A minimum of 1 sequence in the Workflow should have Use property selected.