Schedules
The Scheduler is a powerful component designed to automate the execution of rules and workflows at predefined times or intervals. By eliminating the need for manual intervention, the Scheduler enhances operational efficiency, reduces effort, and ensures consistent, reliable results through time-based automation.
Key Features
- Flexible Execution Options: Schedules can be initiated through APIs, the On-Demand user interface, or automatically based on predefined scheduling configurations.
- CRON Expression Support: Each schedule is driven by a CRON expression. The Quartz CRON Expression Generator is used to define complex scheduling patterns with precision.
- Comprehensive Schedule Types: The Scheduler supports various scheduling options, including:
- One-time executions.
- Daily recurrences.
- Weekly recurrences.
- Advanced custom schedules using CRON expressions.
- Exception Calendar Integration: Avoid unintended executions on predefined holidays or blackout dates by leveraging exception calendars.
- Job Capacity: A single schedule can include up to 100 jobs, with each job representing an individual rule or workflow.
Use Cases
- Automated Execution: Automate the validation of routine processes such as ETL jobs or production data checks to ensure accuracy and consistency without manual oversight.
- Holiday-Aware Scheduling: Configure exception calendars to prevent job execution on federal or organization-specific holidays.
- Flexible Frequency Options: Customize job execution frequency based on operational needs—whether daily, weekly, or using tailored CRON expressions for more granular control.
Components
Schedules in iceDQ are composed of two primary components:
1. Overview: Provides schedule-related metadata and configuration options.
2. Jobs: Lists the workflow tasks to be executed as part of the schedule.
Overview
This component enables users to define schedules and configure both common and specific options based on the schedule type. Below is a breakdown of the fields available within the Overview:
| Field | Description | Purpose |
|---|---|---|
| Schedule Name (Mandatory) | A unique name for the schedule within a folder. It should be descriptive to help users easily identify and understand the schedule’s purpose. | Serves as the primary identifier for the schedule, ensuring clarity and uniqueness within the folder structure. |
| Description (Optional) | A brief explanation of the schedule, offering additional technical or business context. | Helps clarify the intent or scope of the schedule. Useful for team onboarding and audit documentation. |
| Type (Read Only) | Displays the selected schedule type. | Display's schedule template selected during creation. |
| Time Zone (Read Only) | Displays the timezone in which the schedule will operate. | Uses the timezone of the cluster/ server on which application is deployed. |
| Start Date (Mandatory) | The date and time when the schedule becomes active. | |
| End Date (Optional) | The date and time when the schedule will be deactivated. | |
| Holiday Calendar (Optional) | Allows selection of a predefined calendar to avoid job execution on holidays or blackout dates. | Calendars are configured under Administration > Configuration > Exclude Calendars. |
| Reoccur (Optional) | Specifies the interval after which the schedule should repeat. Default value is 0 so if not set the schedule will run daily. The values range to set are from 1 to 7. For example, if value is set to 3, the schedule will run every 3 days. | Applicable only for daily schedules. |
| Execute at These Times – Days | Defines the days of the week on which the jobs should be executed. Multiple values from the days drop-down can be selected. Range - Sunday to Saturday | Applicable only for weekly schedules. |
| Execute at These Times – Hours | Defines the hours of the day when the jobs should be executed. Multiple values from the hour drop-down can be selected. Range - 0(12:00 am) to 23 (11:00 pm). | Applicable to both daily and weekly schedules. |
| Execute at These Times – Minutes | Defines the minutes of the hour when the jobs should be executed. Multiple values from the minutes drop-down can be selected. Range - 0(0 minutes) to 59 (59 minutes) | Applicable to both daily and weekly schedules. |
| Cron Expression | Allows entry of a custom CRON expression to control job execution. | Applicable only for advanced schedules. |
Post-Save Read Only Fields:
After a schedule has been saved, the following values are displayed to provide visibility into its configuration and upcoming execution details:
| Property | Description | Purpose |
|---|---|---|
| CRON Expression | Displays the CRON expression generated based on the selected scheduling options. User can evaluate these expressions using any evaluator service verify scheduler details. | Applicable for One-time, Daily, and Monthly schedules. |
| Next Run | Shows the date and time of the next scheduled execution. | Helps in tracking and verifying the schedule's execution timeline. |
| Run As | Indicates the username under which the schedule jobs will be executed. | Jobs using user connections will use the credentials or RunAs user for execution. If the user is not valid then these jobs will start failing |
Jobs
This component allows users to assign workflows as jobs to be triggered by the schedule. The Jobs tab displays all folders and workflows available in the workspace. Users can select and manage workflows using the following options:
- Filter: Narrow the list of workflows by selecting specific folders using the ✔️ Checkmark icon.
- Search: Use the search bar to locate workflows by name or keyword.
- Add Workflow
 : Add selected workflow(s) to the schedule using the button.
 - Delete Workflow
 : To remove one or more workflows.
The following screenshot shows the fields in the Jobs tab:
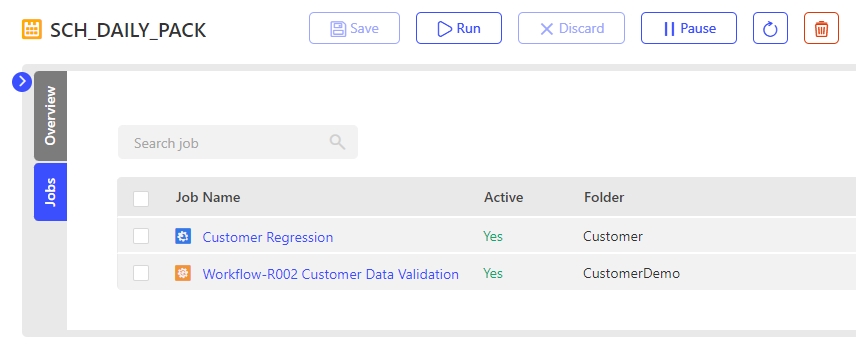
At this time, we can only add workflows to the jobs. So the rules in the folders are also displayed as workflows. When any such workflow executes, the rule gets executed.
How To: Create a Schedule
Following are the respective links to a step by step guide to create each schedule type:
- How To: Create a One Time Schedule
- How To: Create a Daily Schedule
- How To: Create a Weekly Schedule
- How To: Create an Advance Schedule
How To: Delete a Schedule
- From the main application menu, navigate to the Scheduler section.
- Within the Scheduler section, select the Schedules tab to view and manage schedules.
- Select one or more schedules to be Deleted. Use ✔️ button.
- Click on the option to delete the schedule.
- Select Delete option.
- Cancel: Optionally select this option to exit the delete process.
Other Actions
Once the schedule creation is complete, users have following options:
| Field Name | Description |
|---|---|
| Discard | This option is available throughout the process until the Save option is hit. During the initial creation, if discard is pressed, the entire schedule will be discarded. Once the discard is saved and then any changes are made, discard will roll back only the changes made during the last edit. |
| Save | Once the schedule configuration is complete, the save option commits the workflow created. |
| Run | Once the schedule is saved, the Run option will activate. This option will actually execute the schedule. This will be a manual execution as it is not a time based scheduled. |
| Recent Runs | Will highlight the box that displays the recent runs. |
| Delete | Deletes the schedule. This option is activated once the schedule is saved. |
| Pause/Resume | This option is used to send the email notification to select users on test Success, test Failures and workflow execution Errors. |
Considerations
- Only alphanumeric, hyphen, period, at sign, space and underscore characters are allowed on schedule name.
- Schedule name is unique within a folder.
- RunAs displays the name of user who created or last updated the schedule.
- Users can pause schedule using Pause button.
- Users can resume a paused schedule using the Resume button.
- Users can run a schedule manually using Run button. If a schedule is paused, the Run button will be disabled.