Advance
The Advance Schedule template allows users to trigger a rule or workflow based on a custom CRON expression. This provides maximum flexibility for defining complex or highly specific execution patterns—such as seasonal runs, irregular intervals, or precise date-time combinations.
How To: Create an Advance Schedule
- Navigate to the Scheduler module.
- Select the Schedules tab to create a new schedule.
- Click New Schedule.
- Configuring schedule settings:
- Select Folder: To search for and select the appropriate workspace folder where the schedule will be stored.
- Input Schedule Name: Enter a descriptive and unique name to identify the schedule within the selected folder.
- Choose Template: Select Advance template.
- Enter the following details:
| Field Name | Description |
|---|---|
| Description (Optional) | A short explanation giving business or technical context. |
| Start Date | Use |
| End Date (Optional) | Use |
| Holiday Calendar (Optional) | Enable and select a predefined holiday calendar to skip execution on holidays. |
| Cron Expression | Specify the cron expression for triggering the schedule. |
- In the Jobs tab, add the workflows to be triggered. Follow the below steps:
- Filter workflows by selecting specific folders using the ✔️ Checkmark icon.
- Use the
 button to search and add one or more workflows.
- Click Save to create the schedule.
- Once saved following options will be displayed:
- Next Run: Displays the date and time of the next scheduled execution.
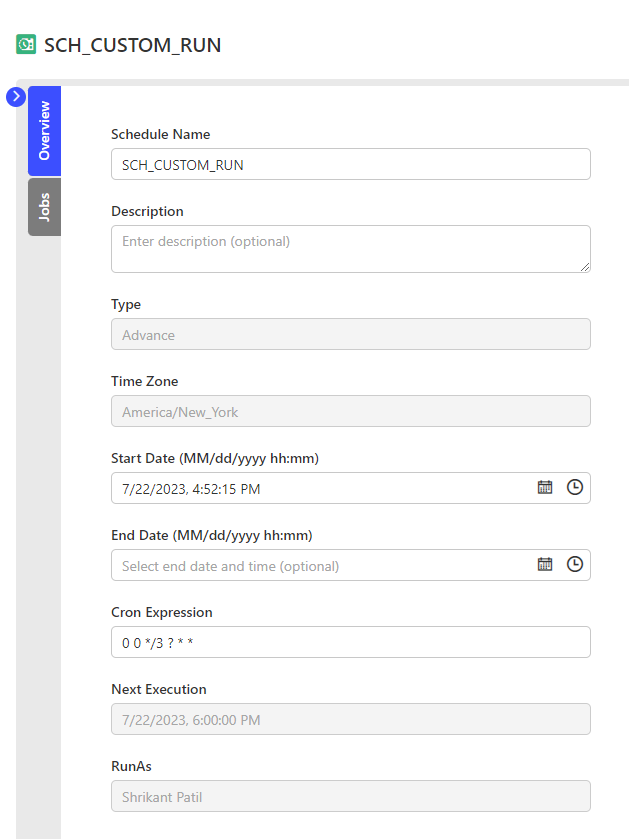
- Run As: Displays the username under which the jobs will be executed.
The following screenshot shows the fields in the Advance Schedule:
Example Schedule:
If you configure the following CRON expression:
0 30 6 ? JUN,JUL,AUG,SEP,OCT,NOV,DEC MON,TUE,WED,THU,FRI 2025
This schedule will trigger jobs:
- Time:
6:30 AM - Days:
Monday to Friday - Months:
June through December - Year:
2025 - Start Date:
June 2, 2025 - End Date:
December 31, 2025
This advanced setup is ideal for seasonal tasks or time-bound processes that need precise control over months, weekdays, and execution time.
Video Guide
This video shows how to create an Advance Schedule.
Considerations
- Schedule names can include alphanumeric characters, hyphens (-), periods (.), at signs (@), spaces, and underscores (_).
- Each schedule name must be unique within a folder.
- Run As displays the user who created or last updated the schedule.
- You can pause a schedule using the Pause button.
- You can resume a paused schedule using the Resume button.
- Use the Run button to manually trigger the schedule. If the schedule is paused, the Run button is disabled.