Snowflake Key Pair Authentication
Overview
Snowflake supports public-private key authentication as a secure alternative to password-based login. This method uses a cryptographic key pair to verify the user's identity without requiring password input. This method is based on asymmetric encryption, where the public key encrypts (or verifies) and the private key decrypts (or signs) data.
Key Pair Components
- Private key: A secret key stored securely on the user's local system. This key is never shared and must be protected.
- Public key: Stored in Snowflake and linked to the user's account. It functions as a lock that can only be opened by the matching private key.
Process for Key Pair Authentication
- Generate Key Pair: The user creates a private key (to be stored locally) and a public key (to be registered with Snowflake).
- Sign a JSON Web Token (JWT): When logging in, the user uses their private key to sign a JWT, which includes key metadata such as the username and account identifier.
- Send JWT to Snowflake: The signed JWT is submitted to Snowflake as part of the authentication request.
- Verify the Signature: Snowflake uses the previously stored public key to validate the JWT's signature, ensuring it was generated by the matching private key.
- Authenticate the User: If the verification is successful, Snowflake grants access. This confirms that the correct private key was used, completing the authentication process.
Configuring Key Pair Authentication
Part 1: Generating a Private Key
To enable key pair authentication in Snowflake, the initial step is to generate a secure private key on the user's local system. The OpenSSL toolkit is essential for managing cryptographic operations, including the generation of secure keys and certificates. This process can be performed on any server environment. In the following example, the steps are demonstrated using Windows Command Prompt.
Step 1: Confirm OpenSSL Version : To verify that OpenSSL is installed and to check its version, run the following command. If OpenSSL is not installed on the system, please follow the appropriate installation guide for your operating system before proceeding with the setup.
openssl version
Step 2: Generate a Private Key : To generate a private key, execute one of the following commands depending on the version of OpenSSL being used.
- For OpenSSL v1.0.2: Use the command below to generate a 2048-bit RSA private key. The key is then encrypted using DES3 encryption for enhanced security. This command creates a secure private key file named rsa_key.p8 in PKCS#8 format, which is required for key pair authentication in Snowflake.
openssl genrsa 2048 | openssl pkcs8 -topk8 -v2 des3 -inform PEM -out rsa_key.p8
- For OpenSSL v1.1.1 and above: To generate a 2048-bit RSA private key, run the following command. This command uses the PBE-SHA1-3DES encryption method to secure the private key.
openssl genrsa 2048 | openssl pkcs8 -topk8 -inform PEM -v1 PBE-SHA1-3DES -out rsa_key.p8
Upon execution, the user will be prompted to enter a passphrase, "Enter Encryption Password". This passphrase encrypts the private key and is required later when decrypting the key to connect to Snowflake. Store this passphrase securely. It acts as an additional layer of protection and will be needed during authentication. For example, when prompted, the user may enter a passphrase such as "icedq2025".
Step 3: Decrypt & View the Private Key : To decrypt and view the base64-encoded private key, run the following command. This command converts the binary .p8 file into a base64-encoded format and saves it as rsa_base64.txt.
openssl base64 -in rsa_key.p8 -A -out rsa_base64.txt
Once opened, the file will display the private key in the following format:
-----BEGIN PRIVATE KEY-----
MIIEvQIBADANBgkqhkiG9w0BA...
...rest of the key...
-----END PRIVATE KEY-----
This base64-encoded private key will be required when configuring access to Snowflake. Handle this file securely and avoid exposing it in shared environments.

Part 2: Generating the Public Key
After generating the private key, the next step is to create the corresponding public key, which will be registered with Snowflake for authentication.
- Step 1: Generate the Public Key : To generate the public key, extract it from the encrypted private key created in the previous steps (refer to Part 1: Steps 1–3 of this document). Run the following command:
openssl rsa -in rsa_key.p8 -pubout -out rsa_key.pub
When executing this command, the user will be prompted to enter the passphrase that was set during private key creation. This is required to decrypt the private key and extract the public key.
- Step 2: View the Public Key : The generated public key is saved in the rsa_key.pub file. To view its contents, run the following command:
type rsa_key.pub

Part 3: Store the Private and Public Keys Securely
To maintain security and organization, both the private and public keys should be stored in a hidden .ssh directory located within the user's profile directory. This setup ensures proper access control and prepares the environment for secure usage.
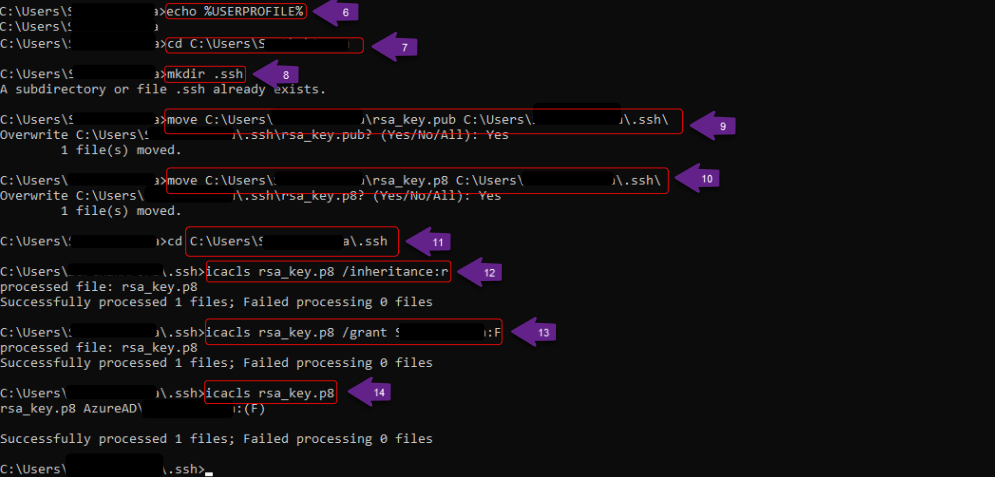
- Step 1: Locate the User Profile Directory : To identify the current user's profile directory, execute the following commands:
echo %USERPROFILE%

cd C:\Users\<USERPROFILE>
Replace 'USERPROFILE' with the actual username value returned by the first command.
- Step 2: Create the .ssh Directory : If the .ssh directory does not already exist within the user profile directory, create it by running the following command:
mkdir .ssh
This directory is a standard location for storing key pairs and is commonly used by various tools for secure authentication.
- Step 3: Move Key Files to the .ssh Directory : To maintain proper organization and align with standard security practices, the user should move both the public and private key files into the .ssh directory. Run the following commands:
move C:\Users\<USERPROFILE>\rsa_key.pub C:\Users\ <USERPROFILE> \.ssh\

move C:\Users\<USERPROFILE>\rsa_key.p8 C:\Users\ <USERPROFILE>\.ssh\
Replace 'USERPROFILE' with the actual user profile name as identified in the previous steps.
Storing key files in the .ssh directory is a best practice that supports secure access management and simplifies integration with tools that expect keys in this location.
- Step 4: Secure the Private Key File : To ensure that the private key file (rsa_key.p8) is accessible only to the authorized user, follow these steps to update the file permissions appropriately.
- Navigate to the .ssh directory by running the following command:
cd C:\Users\<USERPROFILE>\.ssh
Replace 'USERPROFILE' with the actual user profile name.
- Remove inherited permissions to prevent other users on the system from inheriting access to the private key, run:
icacls rsa_key.p8 /inheritance:r
- Grant full control to the current user: Assign full control of the file to the current user account by running:
icacls rsa_key.p8 /grant <USERPROFILE>:F
Replace 'USERPROFILE' with the actual username.
- Verify file permissions: Confirm that the updated permissions have been applied:
icacls rsa_key.p8
After completing these steps, the rsa_key.p8 file will be secured with access granted only to the user’s account, preventing unauthorized access or modification.
Video Guide
This video shows how to configure key pair authentication.
Assign the Public Key to the Snowflake User
Before connecting to Snowflake using key pair authentication, the user must first register their public key with their Snowflake user profile. This allows Snowflake to verify the private key during future login attempts.
Step 1: Open a SQL Editor
To begin, open any SQL editor that supports Snowflake, such as SnowSQL, DBeaver, or the Snowflake Web UI (worksheet). Use standard login credentials or any existing authentication method for this step.
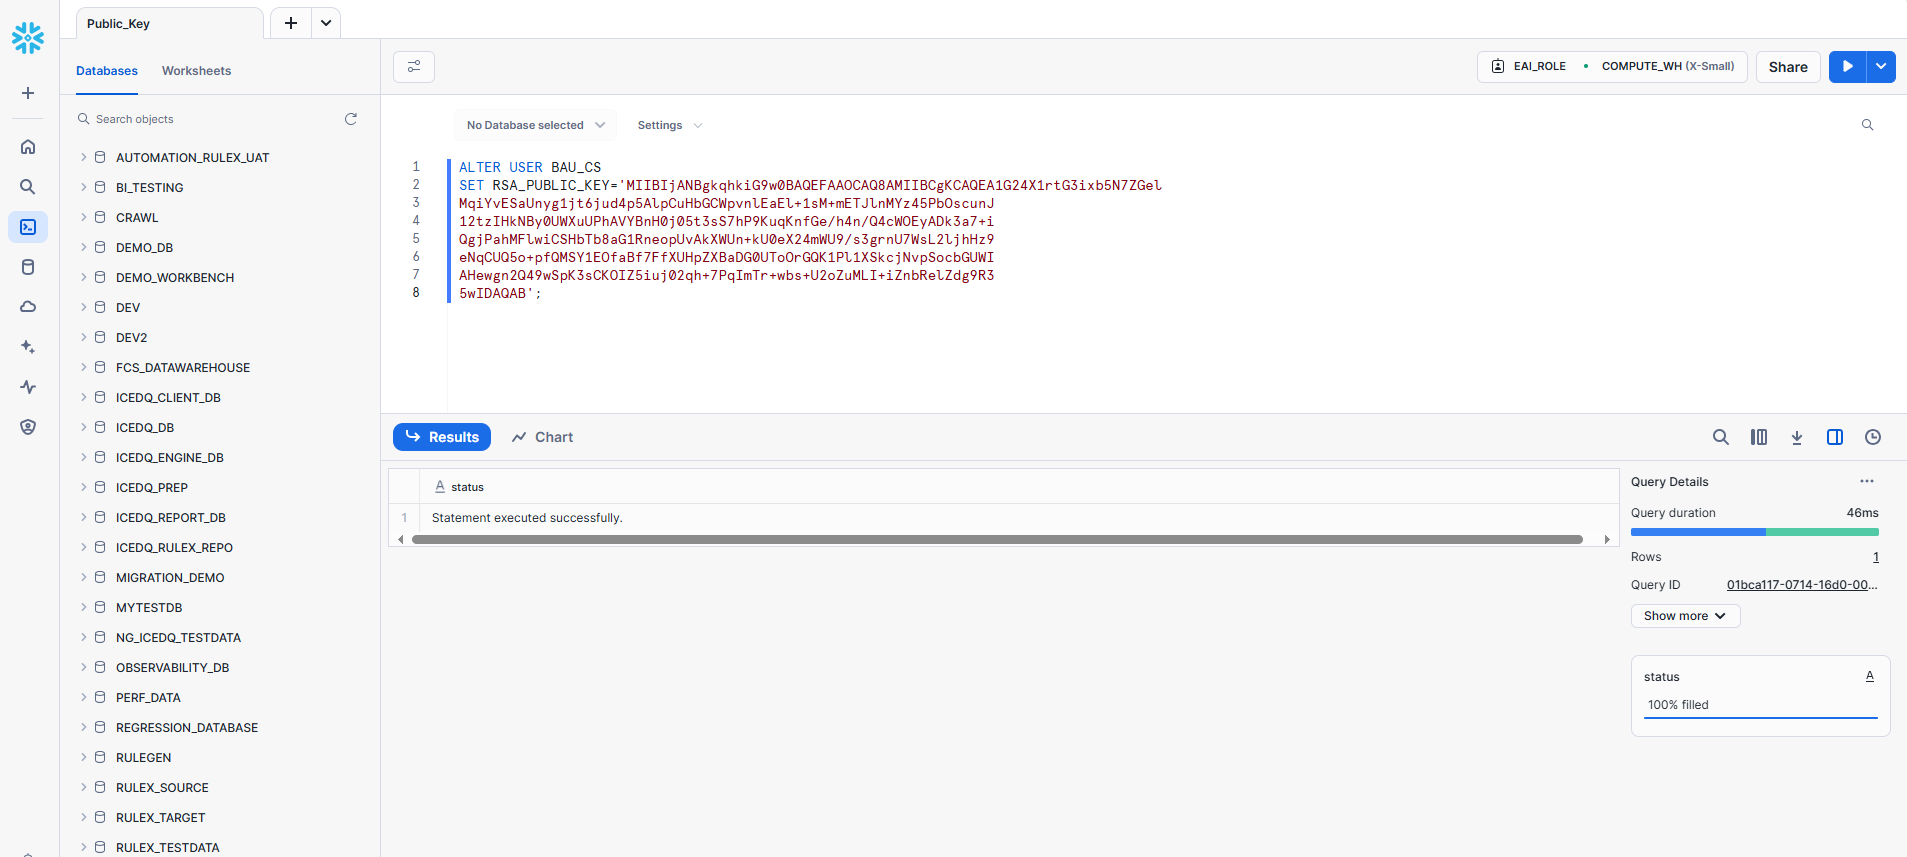
Step 2: Register the Public Key
To complete the key pair authentication setup, assign the generated public key to your Snowflake user account by running the following SQL command:
ALTER USER your_username SET RSA_PUBLIC_KEY='your_public_key';
In the above command, replace: your_username with Snowflake username and your_public_key with the full public key string from Part 2, Step 2. Make sure the public key is provided as a single-line string without line breaks.
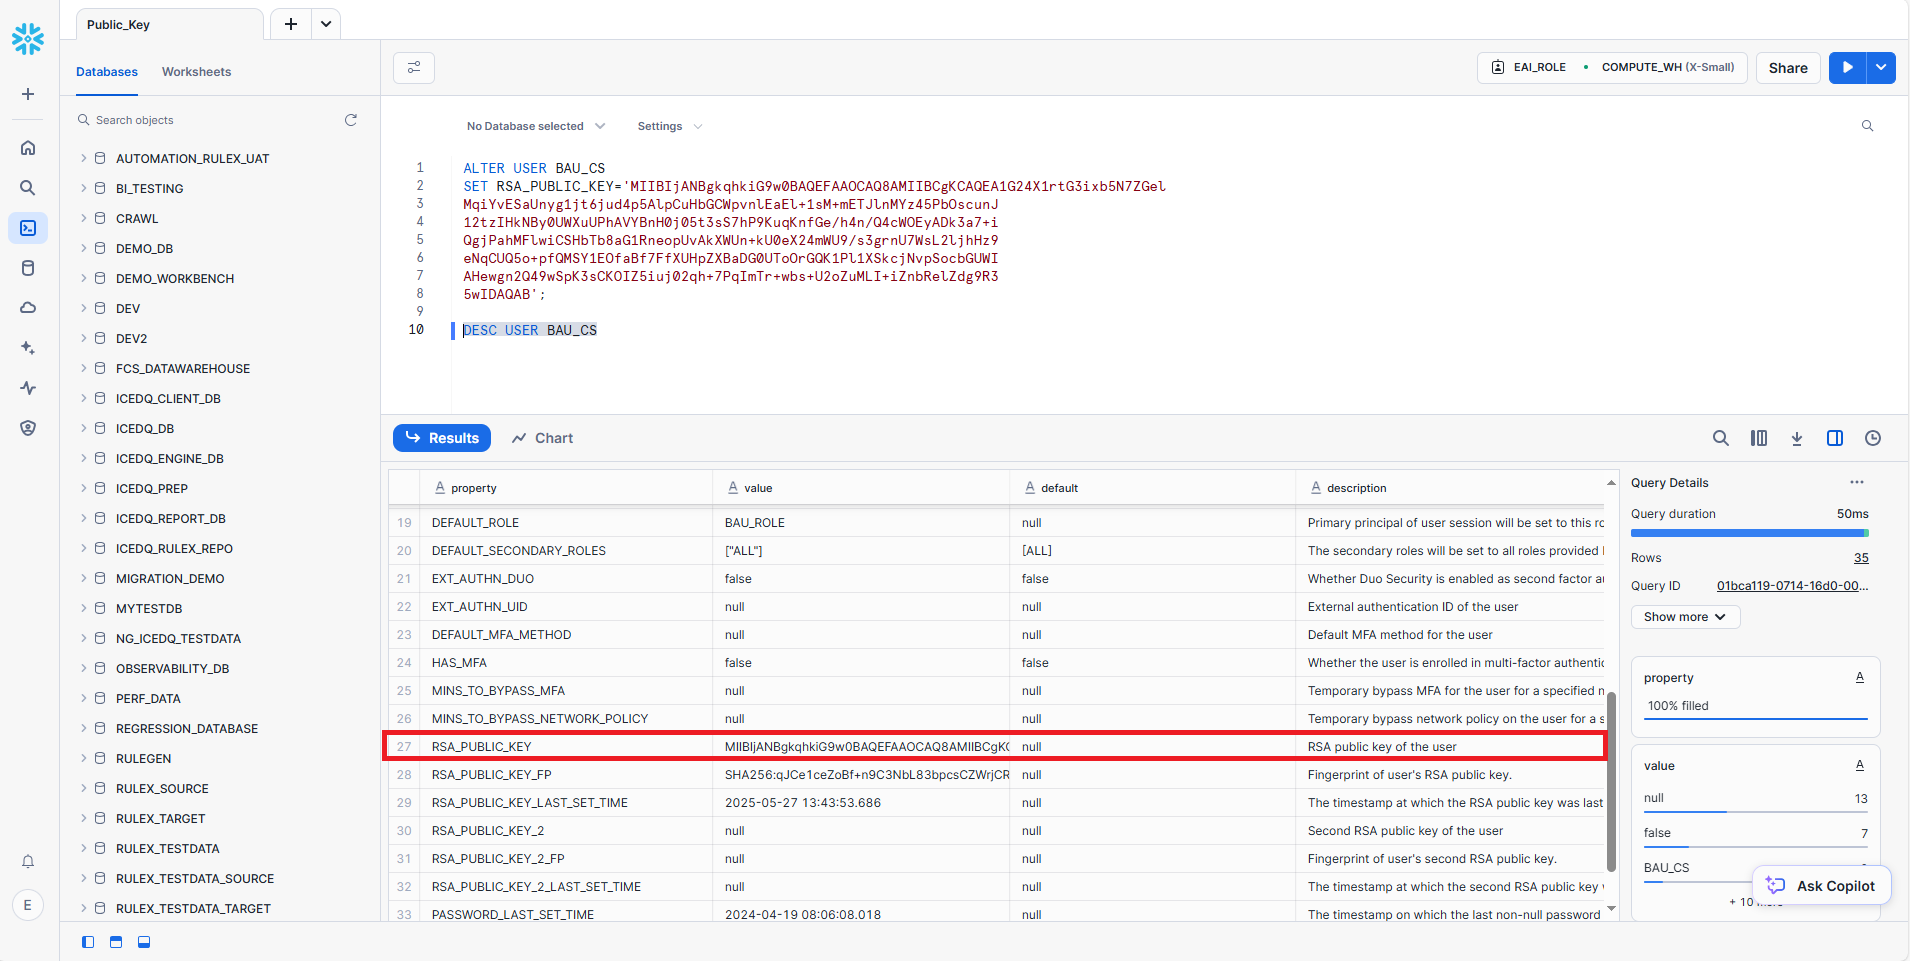
Step 3: Verify the User's Public Key Fingerprint
After assigning the public key, it's recommended to verify that Snowflake has registered it correctly. Run the following command in any SQL editor connected to Snowflake (e.g., DBeaver, SnowSQL, or Web UI):
DESC USER your_username;
Replace your_username with the actual Snowflake username.
Look for the RSA_PUBLIC_KEY_FP field in the output. This displays the fingerprint of the registered public key, confirming successful setup.
Video Guide
This video shows how to assign the public key to Snowflake user.
Snowflake Key-Based Authentication & Connection
To enhance security and centralise credential management, the user must store the private key and passphrase in the iceDQ Secret Manager. This ensures that iceDQ can access Snowflake using key pair authentication without exposing sensitive data in plain text.
Step 1: Create a Secret Key
The user will create a new secret key to securely store the private key and passphrase generated earlier in Section 1. This process is done within the Connections module under the Secrets tab in iceDQ.
- From the main menu, navigate to the Connectors tab.
- Select the “Secrets” tab.
- Click the “+ New Secret” button.
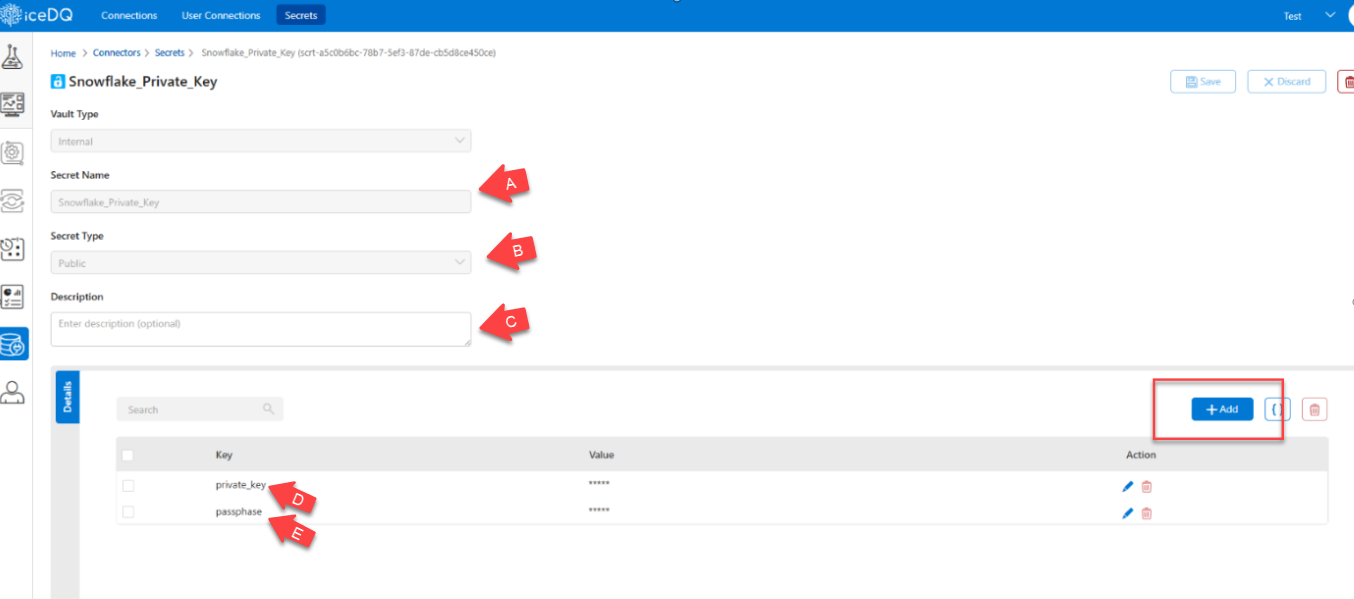
- Enter Secret Details:
In the form that appears, the user must provide the following details:
| Tag | Field | Value | Purpose |
|---|---|---|---|
| A | Secret Name | Snowflake_Private_Key | Used to uniquely identify the private key secret for Snowflake connection. |
| B | Secret Type | Public | Specifies that this secret will be accessible for use by connection modules. |
| C | Description | Private key for Snowflake auth | Optional, it helps document the purpose of the secret for future reference. |
| D | Private Key | Paste contents of rsa_key.p8 file | Used to sign the authentication token when connecting to Snowflake. |
| E | Passphrase | The passphrase set during key creation (e.g., icedq2025) | Used to decrypt the private key. Must match what was set in the command line. |
- Confirm the details and click on Save.
Step 2: Connect to Snowflake Using the Key Pair Authentication
With the secret key securely stored, the user can now configure a secure connection to Snowflake.
- From the main menu, navigate to the Connectors tab.
- Click on the “Connections” tab.
- Click “+ New Connection” to initiate a new setup.
- From the list of connector options, select Snowflake.
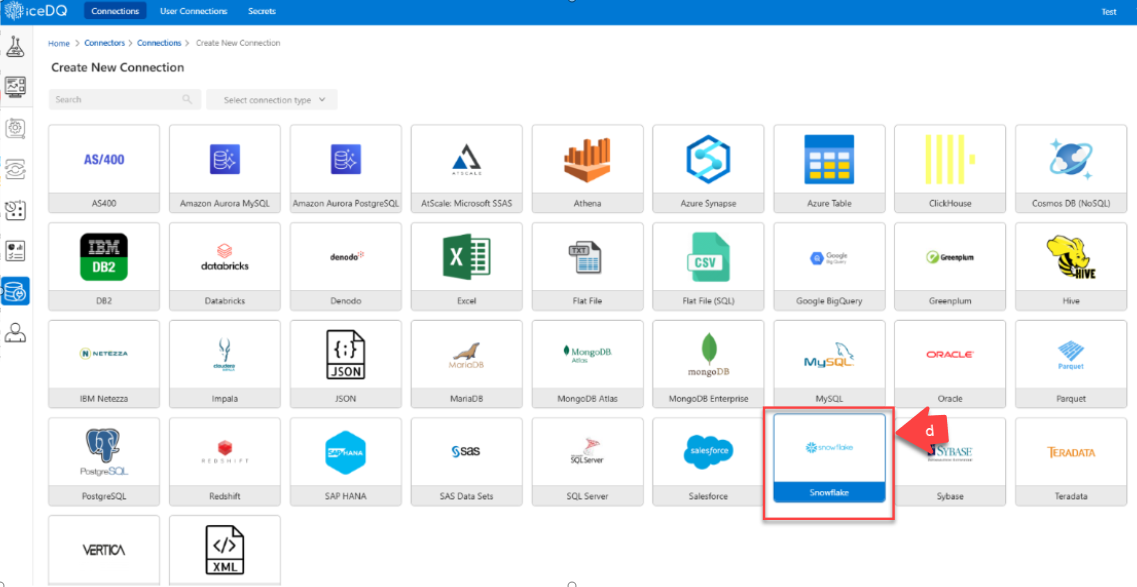
- Fill in the Connection Details:
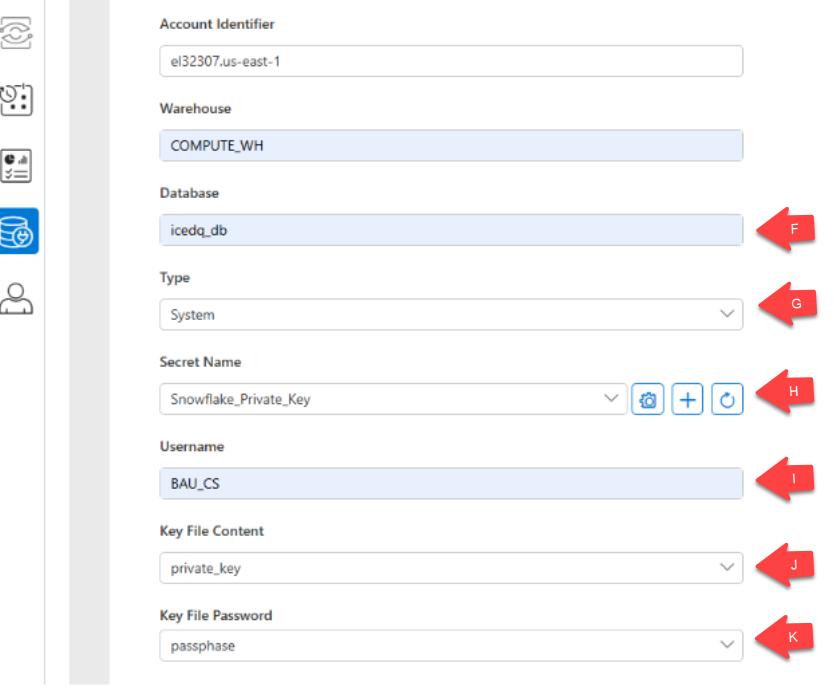
The user should provide the following connection details in the form:
| Tag | Field | Value | Purpose |
|---|---|---|---|
| A | Connection Name | Snowflake_Connection_passkey | Identifies the connection within iceDQ. |
| B | Driver | Snowflake JDBC | Specifies the driver used to connect to Snowflake. |
| C | Authentication | Key Pair | Indicates the authentication method using public-private key pair. |
| D | Account Identifier | el32307.us-east-1 | Unique identifier for the Snowflake account. |
| E | Warehouse | COMPUTE_WH | Specifies the Snowflake virtual warehouse to execute queries. |
| F | Database | icedq_db | Defines the target Snowflake database for this connection. |
| G | Type | System | Marks the connection as a system-level connection within iceDQ. |
| H | Secret Name | Snowflake_Private_Key | References the saved secret containing the private key and passphrase. |
| I | Username | BAU_CS | The Snowflake user associated with this connection. |
| J | Key File Content | private_key | Selects the stored private key for authentication. |
| K | Key File Password | passphrase | Selects the passphrase to unlock the encrypted private key. |
- Confirm the details and Save the connection.
- Click on Test to verify the connectivity.

Video Guide
This video shows how to create Snowflake key-based authentication & connection.