Setup Platform Installer (Online)
This topic explains how to install the iceDQ platform installer in an online environment.
Before you start
Please ensure that all prerequisites have been met before starting the installation. See the Existing Cluster Install Requirements.
Install Platform Installer
To begin installing iceDQ with the platform installer, you must first set up access to administrative (admin) console.
- SSH to the system from where you run Kubectl commands for existing cluster.
- To install the release from
stablechannel replace<>parameters and run the below commands.
curl https://kots.io/install | bash
kubectl kots install icedq \
--namespace icedq \
--shared-password <admin-password> \
--license-file <path-to-license>
for example
kubectl kots install icedq \
--namespace icedq \
--shared-password Admin@2023 \
--license-file torana.yaml
If the KUBECONFIG environment variable is not set you will need to add --kubeconfig /path/to/kube/config to the install command above so that it can authenticate to your cluster.
The installer runs a series of preflight checks to ensure that the node is ready for installation. If any of the preflight checks fail, the installer exits so that the issues can be resolved.
- Once you see the message
Installation Completecopy and paste the URL to access the Admin Console. Use the password provided in install command to login.
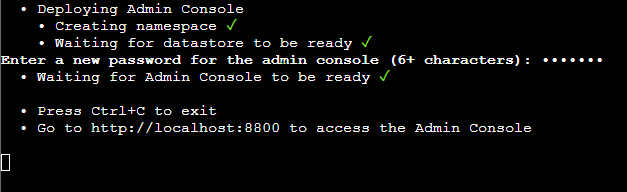
Above command opens localhost port 8800, which forwards to the kotsadm service. So if you are using a GUI based linux or MacOS then you can access the platform installer via http://localhost:8800. You can use below command to port forward.
kubectl port-forward svc/kotsadm 8800:3000
However, if you would like to access platform installer from anywhere then you will have to expose the platform installer UI to be accessed via load balancer. So below are the steps for the same.
- Create a
kotsadm-lb.yamlfile and insert below spec after updating namespace parameter.
apiVersion: v1
kind: Service
metadata:
  name: kotsadm-lb
  namespace: icedq
spec:
  ports:
  - nodePort: 30000
    port: 3000
    protocol: TCP
    targetPort: 3000
  selector:
    app: kotsadm
  type: NodePort
- Apply the above spec to the cluster to expose the service
kubectl -n icedq apply -f kotsadm-lb.yaml
OR use below command to execute step 4 and 5 in a single step
kubectl -n icedq apply -f - <<EOF
apiVersion: v1
kind: Service
metadata:
  name: kotsadm-lb
  namespace: icedq
spec:
  ports:
  - port: 8800
    protocol: TCP
    targetPort: 3000
  selector:
    app: kotsadm
  type: LoadBalancer
EOF
Loadbalancer for nextgen can be created by using below command.
kubectl apply -f - <<EOF
apiVersion: v1
kind: Service
metadata:
  name: icedq-lb
  namespace: icedq
spec:
  ports:
  - name: proxy
    port: 80
    protocol: TCP
    targetPort: 8000
  - name: proxy-ssl
    port: 443
    protocol: TCP
    targetPort: 8443
  selector:
    app.kubernetes.io/component: app
    app.kubernetes.io/instance: icedq
    app.kubernetes.io/name: kong
  type: LoadBalancer
EOF
Install the iceDQ (Using WEB)
Now you are ready to access the iceDQ Platform Installer from a Chrome/ Edge Browser.
- In the browser window, enter the Admin Console (Platform Installer) URL copied in the step 3 above.
![]()
-
On HTTPS for UI, you can Skip & Continue or Enter the FQDN/ IP for the load balancer, and then click Upload & Continue.
-
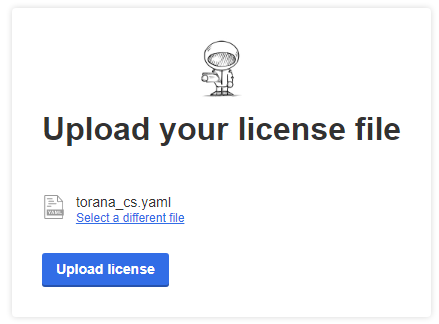
Now select the license.yaml file provided to you and click Upload License.
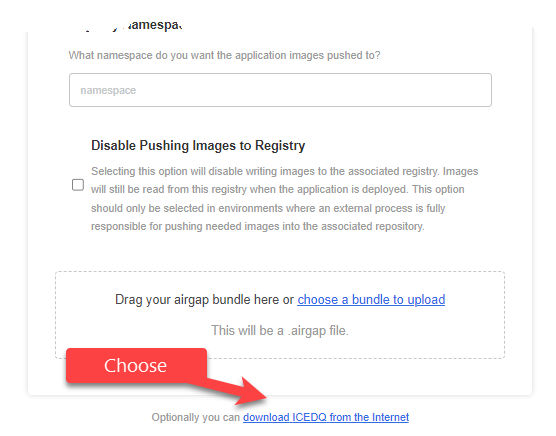
- Choose Download from the internet option to download the application images.
- Next, see the Configure & Deploy iceDQ for deploying the application.