Backup and Recovery
This topic provides a summary of the steps involved in backup and recovery, and provides details on storages. KOTS has documented snapshots extensively in Kots Documentation.
Overview
Back up and recover iceDQ application using KOTS snapshots.
There are two types of snapshots:
- Full snapshots (Recommended): a snapshot of all objects including setup data and applications.
- Full snapshots (Instances) back up the Admin Console and all application data. They can be used for partial restorations, such as application roll back, or full Disaster Recovery restorations (over the same instance or into a new cluster).
- Partial snapshots: a snapshot of application data only.
- Partial snapshots (Application) back up application volumes and application manifests; they do not back up the Admin Console. They can be used for capturing information before deploying a new release, in case of needed roll back, but they are not suitable for full disaster recovery.
You can automate both types of snapshots by admin console UI or command line tool.
Storage required
Snapshots are stored in an AWS S3 bucket or AWS S3-compatible storage (iceDQ recommends either), or in Internal Storage.
You will select and set up the storage option before creating a snapshot. This setup is described below.
Embedded Cluster
iceDQ uses Velero and Restic for backup and recovery, Velero is an open source tool to safely backup and restore, perform disaster recovery, and migrate Kubernetes cluster resources and persistent volumes. More information on Velero.
In case of embedded cluster Velero is already installed withe package.
Velero is installed and configured automatically in iceDQ installations. You do not have to install it.
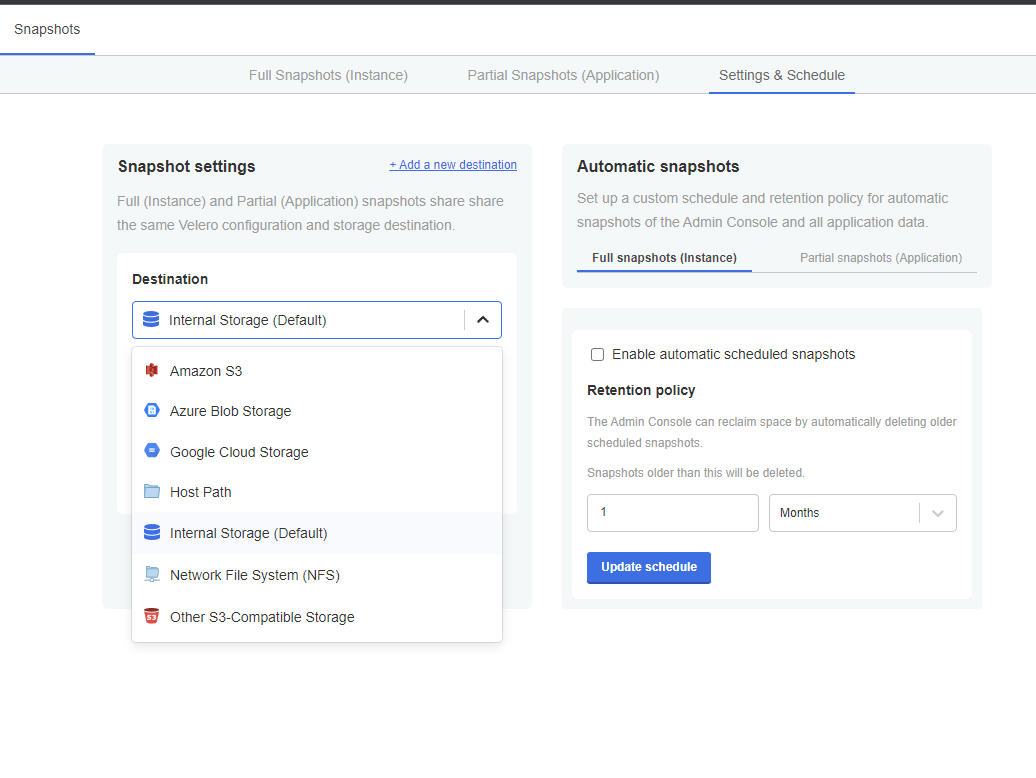
Step 1: Choose storage destination
You have the following options for snapshot storage:
- AWS S3 bucket
- AWS S3-compatible storage
- Internal Storage
- NFS
- Microsoft Azure
- GCP
iceDQ recommends using an S3 bucket or S3-compatible storage to accommodate large files.
Storage destinations are described in the KOTS documentation.
-
Log into the iceDQ KOTS admin tool.
-
Click Snapshots.
-
Click Settings & Schedule.
-
In Storage, select the storage method to use.
In Amazon S3 and Other S3-Compatible Storage, enter the location and credentials.
For details on these settings, see Compatible Backend Stores from KOTS. -
Click Update storage settings. The settings are updated.
Now that you have storage for your snapshots, you can create the snapshots.
Step 2: Create full or partial snapshots
- In the KOTS admin tool, click Full Snapshots (Instance) or Partial Snapshots (Application).
- Click Start a snapshot. The progress of the snapshot is shown on the screen:
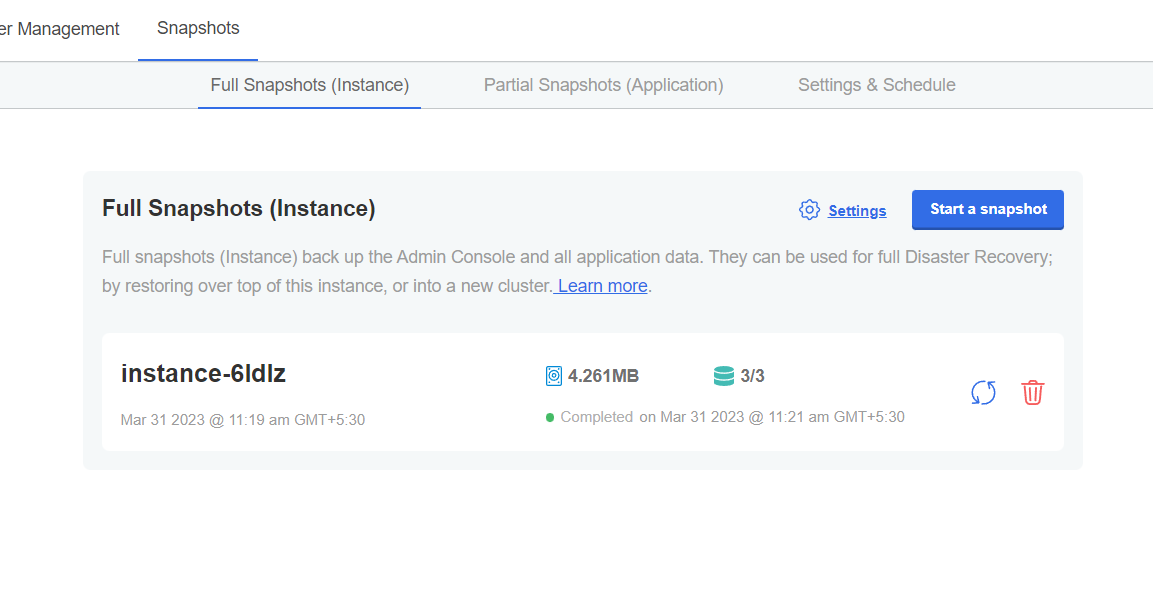
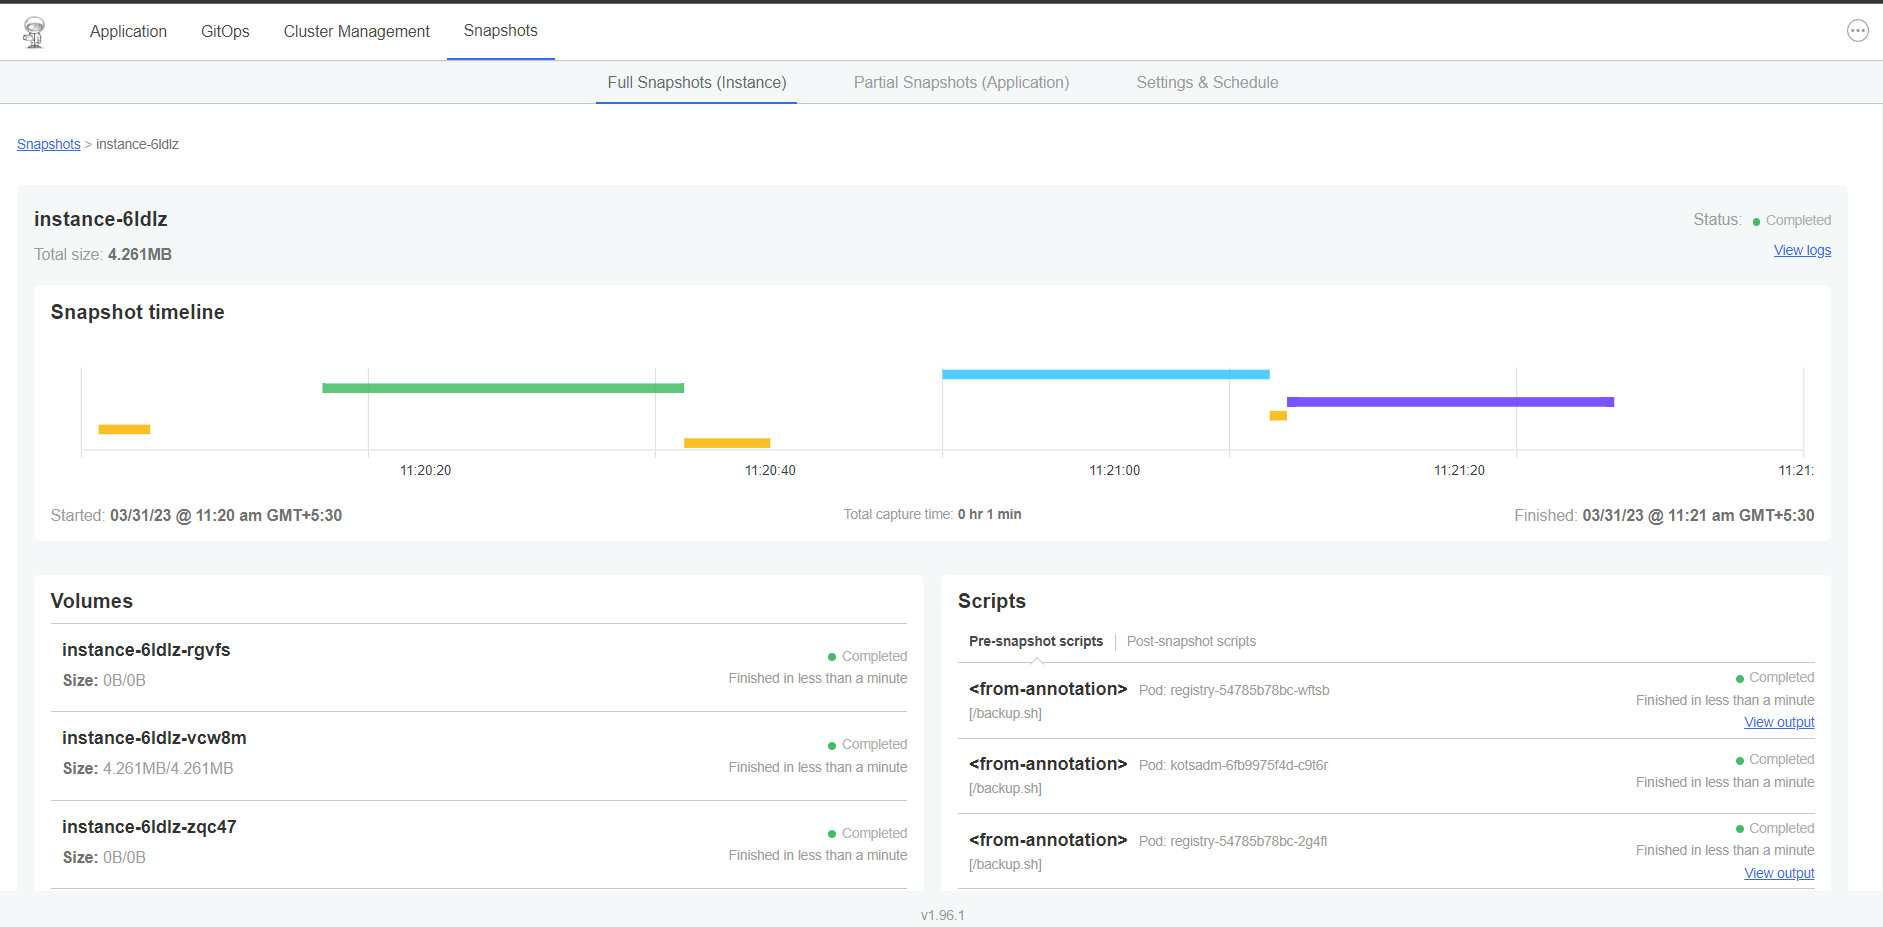
- Click the instance-xxxx to see the details of the snapshot.
Retain the snapshot for recovery operations.
Option: Automating snapshots
Scheduling snapshots is covered in the KOTS Schedules documentation. Here is a summary of the steps:
- To automate snapshots, click Settings & Schedule.
- Select Full snapshots or Partial snapshots.
- Select Enable automatic scheduled snapshots.
- In Schedule, select the schedule for the snapshot.
- In Retention policy, define how long to keep snapshots.
The retention policy is described by KOTS:
The default retention period for snapshots is 1 month. Setting the retention only affects snapshots created after the time of the change. For example, if an existing snapshot had a retention of 1 year and is already 6 months old, and a user then uses the UI to change the retention to 1 month, the existing snapshot will still be around for another 6 months.
- Click Update schedule. The schedule is updated. To disable it, deselect Enable automatic scheduled snapshots.
Option: Restore from a full snapshot
You can perform a full or partial restore from a Full Snapshot. This is why iceDQ recommends Full Snapshots.
-
Click Full Snapshots (Instance).
-
Click the restore button.

Restore from backup appears.
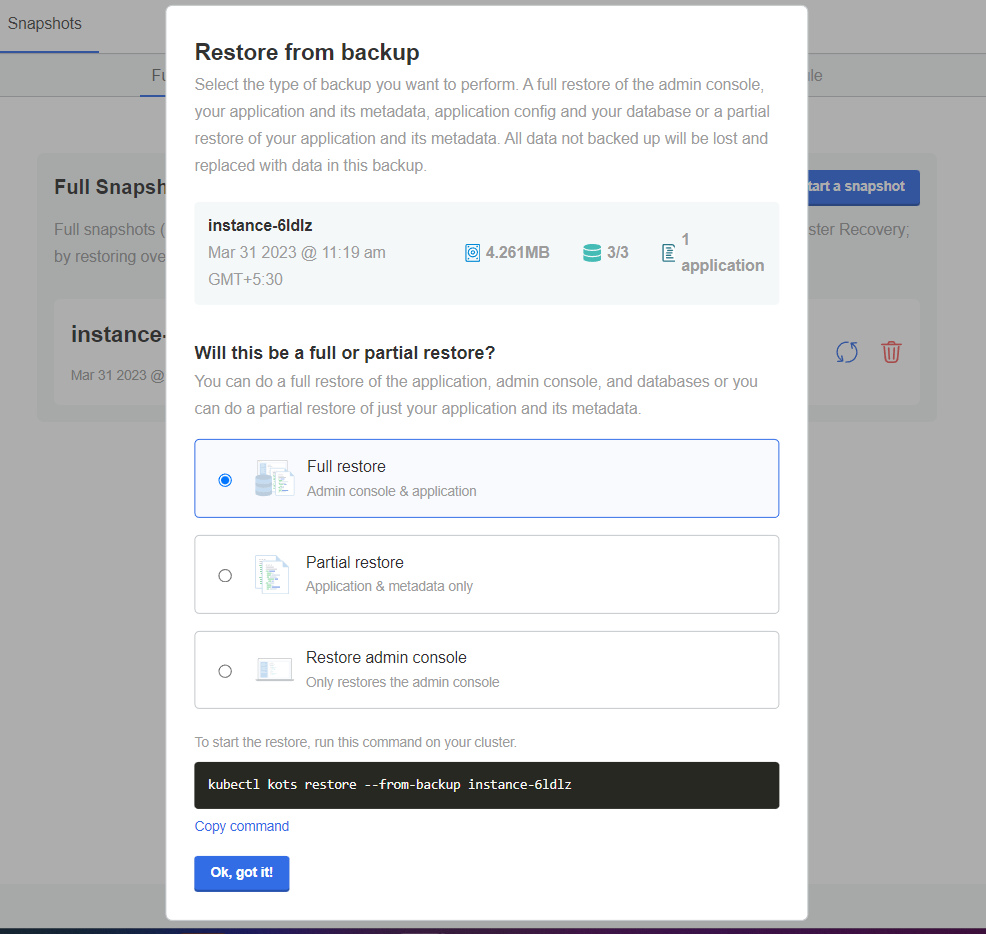
-
Select Full restore or Partial restore.
-
For Full restore, do the following:
- Copy the provided command and run it on any master node. You might need to log into the admin tool again after the restore.
kubectl kots restore --from-backup instance-6ldlzyou can also get backup details from command line by using velero command
$ kubectl kots get backup
NAME              STATUS       ERRORS    WARNINGS    STARTED                          COMPLETED                        EXPIRES
instance-6ldlz    Completed    0         0           2023-03-31 11:19:52 +0530 IST    2023-03-31 11:21:30 +0530 IST    29d

or
$ velero get backup
AME             STATUS      ERRORS   WARNINGS   CREATED                         EXPIRES   STORAGE LOCATION   SELECTOR
instance-6ldlz Completed 0 0 2023-03-31 11:19:52 +0530 IST 29d default kots.io/backup=velero- Click Ok, got it.
-
For Partial restore, do the following:
- Enter the slug icedq.
- Click Confirm and restore. You might need to log into the admin tool again after the restore.
Option: Restore from a partial snapshot
You can perform a partial restore using a Full or Partial Snapshot. The Full Snapshot steps are described above.
-
Click Partial snapshots.
-
Click the restore button.
Restore from Partial backup (Application) appears.
-
Enter the slug iCEDQ.
-
Click Confirm and restore. You might need to log into the admin tool again after the restore.
Existing Cluster
In case of existing cluster please use the existing backup and recovery procedure that you are following or please follow below recommended steps from iceDQ.
To backup and recover iceDQ recommonds Velero and Restic as a underline technology which is open source, more info
Below steps can be followed to take the backup from command line or use admin console to schedule backups.
- Download Velero 1.9.0 for the OS version from which you run kubectl commands:
Download the velero online
All the latest releases are available on below location
https://github.com/vmware-tanzu/velero/releases/curl -fsSL -o velero-v1.10.2-linux-amd64.tar.gz https://github.com/vmware-tanzu/velero/releases/download/v1.10.2/velero-v1.10.2-linux-amd64.tar.gz - Untar the file and change the directory,
tar -xvf velero-v1.10.2-linux-amd64.tar.gz
cd velero-v1.10.2-linux-amd64 - Once in velero downloaded untarred directory, run below command with option mentioned as is-
This will install the velero and restic on server under
./velero install \
       --use-volume-snapshots=false \
       --no-default-backup-location \
       --no-secret \
 	   --use-node-agent \
 	   --uploader-type=restic \
--plugins velero/velero-plugin-for-aws:v1.6.0 -n velerovelero namespace - Once installation is done use
velero versionto check if installation is done. - Once the velero is installed, backup and restore can be done by following the process mentioned above.
Below Velero commands can be used incase of unavailability of admin ui console.
$ velero backup-location get
NAME      PROVIDER   BUCKET/PREFIX                                                 PHASE       LAST VALIDATED                  ACCESS MODE   DEFAULT
default   aws        icedq-backup-restore-test-13-march-2023/backup-restore-data   Available   2023-03-31 16:48:29 +0530 IST   ReadWrite     true

$ kubectl kots backup get
  • Connecting to cluster ✓
  • Creating Backup ✓
  • Backup completed successfully. Backup name is instance-888p4
Restore from a Full (Instance) Snapshot in a DR scenario
Before continuing, you must ensure that your target cluster is ready for restoration. This includes having velero installed as documented here. This procedure also requires the kots kubectl plugin to be installed. Belows backup commands are only required if snapshots are not setup from admin console UI.
AWS S3:
$ kubectl kots velero configure-aws-s3 access-key \
  --namespace <namespace> \
  --access-key-id <s3-secret-access-key-id> \
  --secret-access-key <s3-secret-access-key> \
  --region <s3-bucket-region> \
  --bucket <s3-bucket>
Other S3:
$ kubectl kots velero configure-other-s3 \
  --namespace <namespace> \
  --access-key-id <s3-secret-access-key-id> \
  --secret-access-key <s3-secret-access-key> \
  --endpoint <s3-bucket-endpoint> \
  --region <s3-bucket-region> \
  --bucket <s3-bucket>
NFS:
$ kubectl kots velero configure-nfs \
  --namespace <namespace> \
  --nfs-server <nfs-server-fqdn> \
  --nfs-path <export-nfs-path>
Hostpath:
Ensure that your snapshot volume mount is mounted and accessible on each individual node, then:
$ kubectl kots velero configure-hostpath \
  --namespace <namespace> \
  --hostpath </path/to/hostpath>
Restores commands
A process takes place after configuring the snapshot storage location that discovers which snapshots are available for restore. After a few minutes, you can run the following to show the backups that are available:
$ kubectl kots backup ls --namespace <namespace>
NAME              STATUS       ERRORS    WARNINGS    STARTED                          COMPLETED                        EXPIRES
instance-nc8rj    Completed    0         0           2021-04-13 15:48:17 +0000 UTC    2021-04-13 15:49:00 +0000 UTC    29d
Select the backup you want to restore from the list and restore it via this command:
$ kubectl kots restore --from-backup instance-nc8rj
   • Deleting Admin Console ✓
   • Restoring Admin Console ✓
   • Restoring Applications ✓
   • Restore completed successfully.
- Snapshots cannot be restored to a different namespace than when the snapshot was taken.
- Snapshots cannot be restored to different installation methods. For example, online cluster snapshots cannot be restored to offline clusters.
- AWS S3 buckets with a bucket policy that requires the server-side encryption header are not supported. If you need to require server-side encryption for objects, iceDQ recommends that you enable default encryption on the bucket itself instead.
- Cleanup and removal of snapshots can only be done through the SPI admin console snapshots tab. Removing data from the snapshot storage itself will result in data corruption and loss of snapshots.
- The NFS server must be configured to allow access from all the nodes in the cluster.
- The NFS directory must be owned by the user:group 1001:1001.
- The target directory needs to be read-writable by the user:group 1001:1001
- All the nodes in the cluster must have the necessary NFS client packages installed to be able to communicate with the NFS server. For example, the nfs-common package is a common package used on Ubuntu.
- Any firewalls must allow traffic between the NFS server and clients
See the KOTS documentation for more details on backup and recovery settings.