Setup Platform Installer (Offline)
This topic explains how to install the iceDQ platform installer in an offline environment.
Before you start
Please ensure that all prerequisites have been met before starting the installation. See the Existing Cluster Install Requirements.
Access and Download the iceDQ Helm Chart
-
Login to Helm chart registry:
The Helm chart is available in the iceDQ's private registry. Use the password provided by the iceDQ team. Log in with this command (replace email with the one given to iceDQ team):
helm registry login registry.icedq.com --username <email> --password <strong-password> -
Download Helm chart locally:
After logging in, download and extract the iceDQ Helm chart into a local directory (e.g., /home/user) using:
cd /home/user
helm fetch oci://registry.icedq.com/icedq/stable/icedq
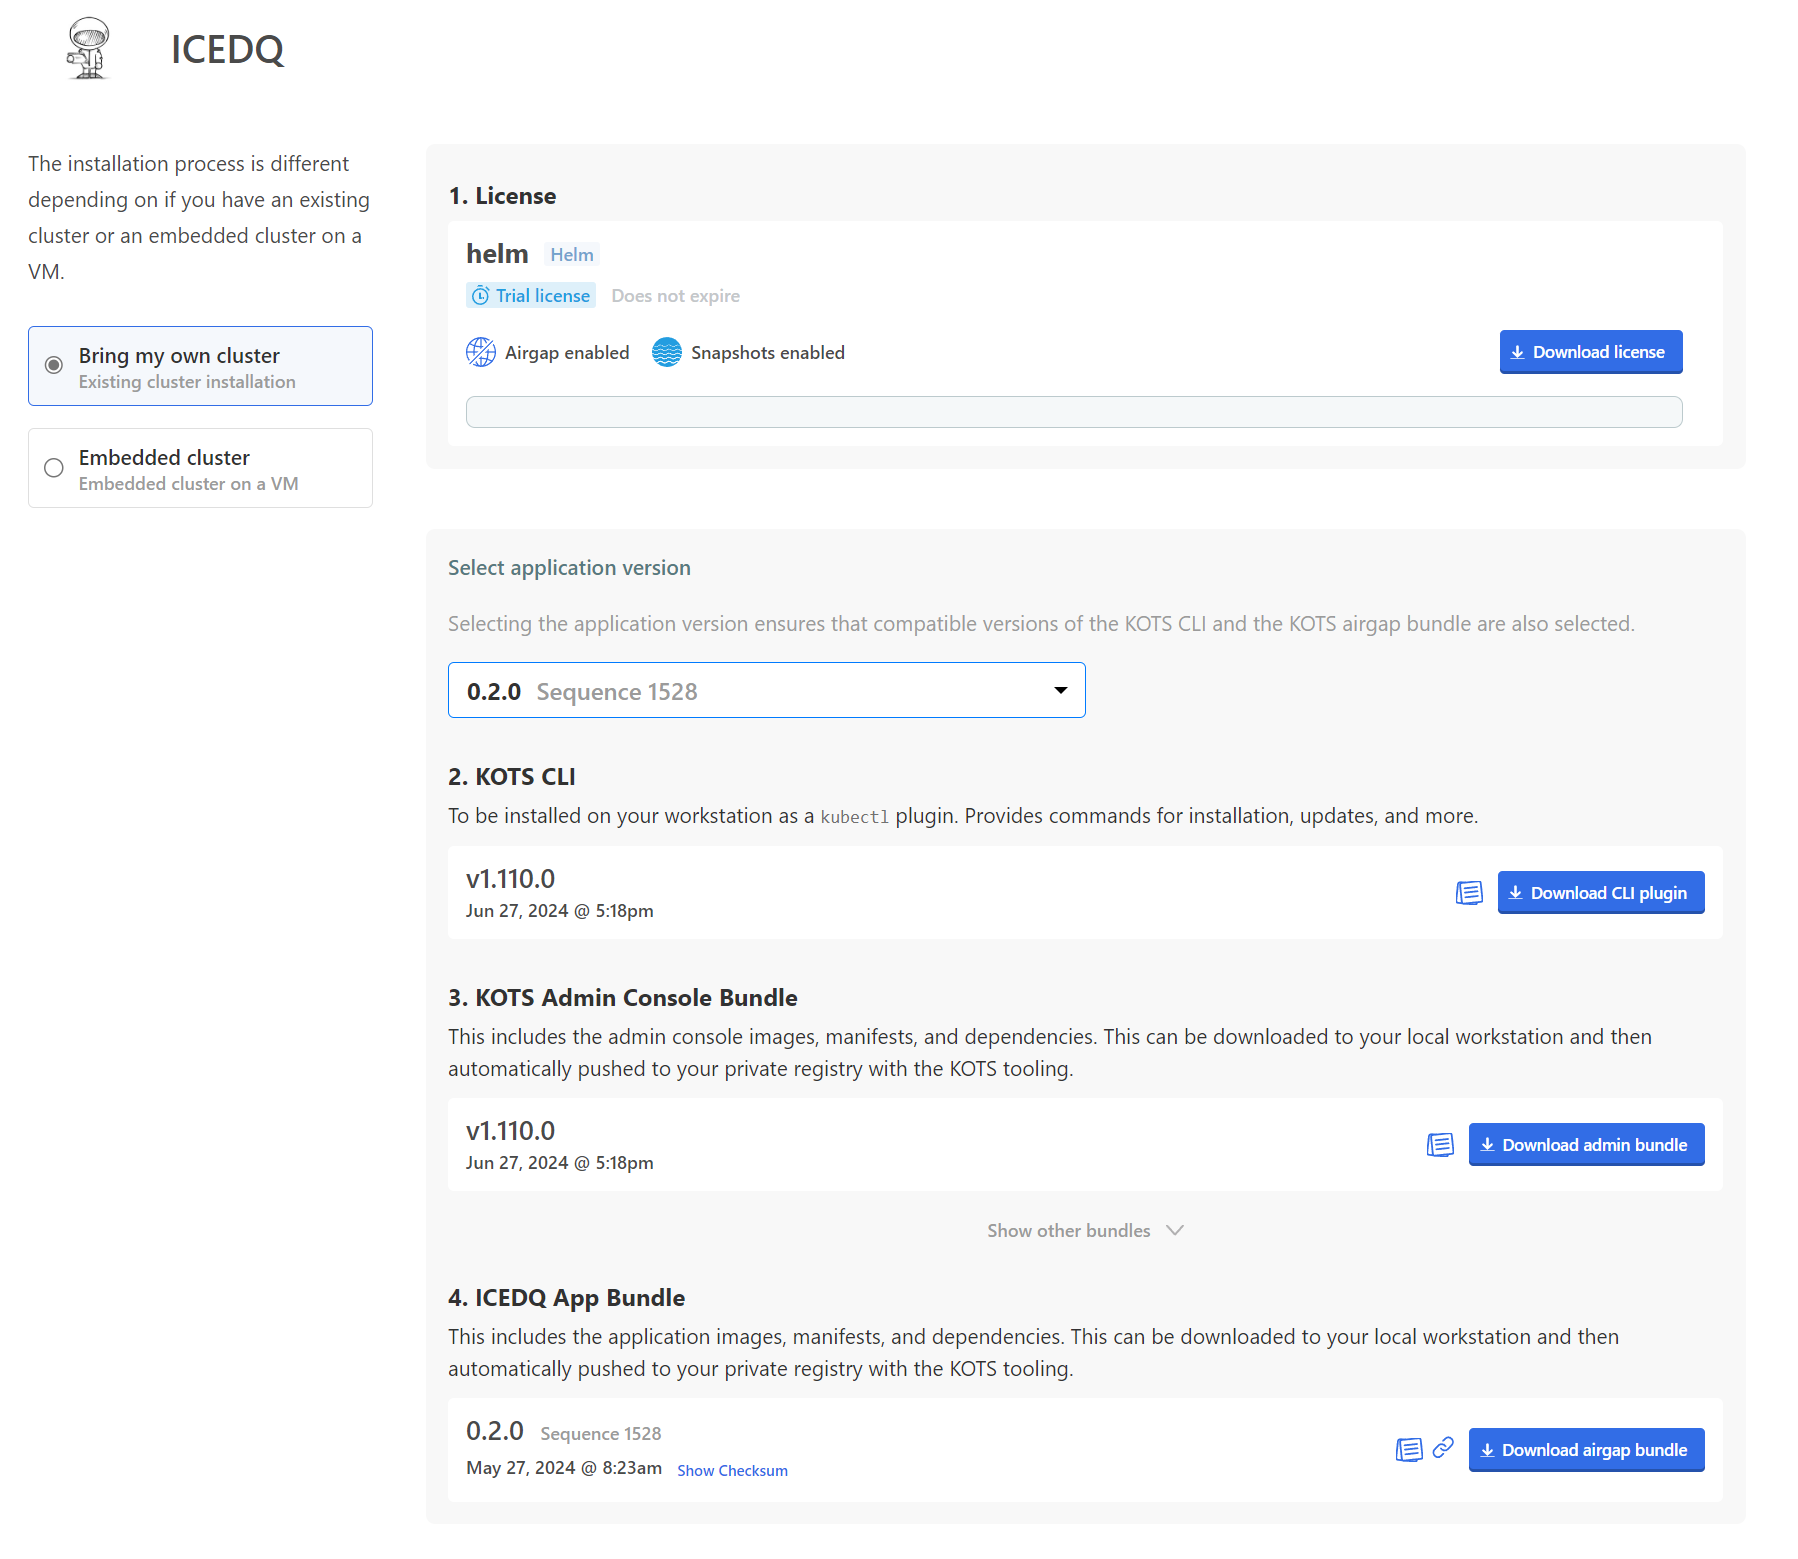
Download Airgap Bundles
From the download portal, download following files and push it to server.
- KOTS CLI plugin.
- KOTS Admin Console Bundle. (kotsadm.tar.gz)
- iceDQ App Bundle. (.airgap.tar.gz)
Install Kubectl Add-On
- Extract KOTS CLI plugin
tar xvf kots_linux_amd64.tar.gz
- Rename the kots binary to kubectl-kots
mv kots kubectl-kots
- Move the kubectl-kots binary into your PATH so that it can be recognized by Kubectl (e.g. /usr/local/bin)
mv kubectl-kots /usr/local/bin
- Verify the installation
kubectl kots --help
Install kots plugin
-
Download the
kotsadm.tar.gzandicedq-{version}.airgapoffline packages and copy it to your jumpbox. -
Upload the kots installer container images to your private registry to prepare for installation into the existing Kubernetes cluster.
kubectl kots admin-console push-images ./kotsadm.tar.gz <registry-endpoint>/icedq.azurecr.io \
  --registry-username <username> \
  --registry-password <password>
If you are using AWS ECR or Azure ACR then repositories should be created before the install process.
- Upload container images of iceDQ application with below command.
kubectl kots admin-console push-images ./icedq.airgap REGISTRY_HOST/icedq.azurecr.io \
  --registry-username <username> \
  --registry-password <password>
Make sure to include icedq.azurecr.io in your command as mentioned above. It's the namespace for the images that will be uploaded to the private registry.
Customize the local values file
This installation offers multiple customization options. Use a local values file (named local-values.yaml) for customizations when installing any Helm application.
Ensure your values file configures these essential elements:
At the minimum, your values must configure the following elements:
hostDomainpostgres databaseappAdminUserappAdminPassword
Update your Values.yaml file with local registry details.
global:
  localRegistryNamespace: 'icedq.azurecr.io'
  registry: 'your.private-registry.io'
  imagePullSecrets:
    - name: private-registry-secret # Existing docker secret used to pull images
Below is an example values file covering these elements:
global:
   localRegistryNamespace: 'icedq.azurecr.io' # required for airgap installation
   registry: 'your.private-registry.io'       # required for airgap installation
   imagePullSecrets:                          # required for airgap installation
     - name: private-registry-secret          # Existing docker secret used to pull images
   hostDomain: app.icedq.net
   appAdminUser: superuser
   appAdminPassword: super-password
tlsCertificate: "WW91IGFyZSBsb29raW5nIGF0IGEgZHVtbXkgY3J0IGZpbGUuIEl0IGlzIGJhc2U2NCBlbmNvZGVkLg=="
tlsKey: "WW91IGFyZSBsb29raW5nIGF0IGEgZHVtbXkgYmFzZTY0IGVuY29kZWQga2V5IGZpbGUu"
database:
   type: external
   provider: "postgres"
   username: "<User-name>"
   password: "<Strong-Password>"
   host: "test.postgres.database.azure.com"
   port: 5432
   databaseName: icedq_db
keycloak:
   authRealm: icedq
## Enable Kong if you don't have an ingress controller
tags:
   enableKong: true
kong:
   proxy:
      enabled: true
      type: "NodePort"
      tls:
         nodePort: "8443" ## Replace this port number
         enabled: true
ingress:
   className: "contour" ## Replace with the name of your ingress class name.
rootCaCertificate: |
   IwYDVQQKDBxUb3JhbmEgRW50ZXJwcmlzZXMgUHZ0LiBMdGQuMQ8wDQYDVQQDDAZU
   JrOq0WUrzJY0mb/JV1Shg5x08Vf/IvIJhriDG7ldt9JqqCVaXMQ0szBTBxAQGw2e
   D4Z7cyrtWPd9o2TX
   -----END CERTIFICATE-----
## Only if you want to use an existing storage class and persistent volume. Configure only storage class if you want to provision a new peristent volume.
pvc:
   #storageClassName: Provide the existing storage class. Keep empty to create new one automatically.
   storageClassName: "azurefile-csi"
   storageSize: "200Gi"
   #volumeName: If a persistent volume has been created using the storage class mentioned above, please provide the name of that persistent volume.
   volumeName: ""
volumeprovisioner:
   storage:
      # type is field to configure either azure-files/aws-efs/embedded-nfs-provisioner. The embedded-nfs-provisioner is the embedded volume provisioner. The aws-efs is the AWS EFS file system.
      # none - if you already have your storage class created in your cluster. Specify the class name under pvc>storageClassName
      type: "none"
- Replace the registry value with your private registry domain.
- Replace the
private-registry-secretwith the your secret name.
These three fields are required for using the private registry with iceDQ Helm charts.
Run preflight checks
Preflight checks are critical for a successful installation. The following rules apply:
- Preflight Check Failures: If preflight checks fails, the installation must not continue until the targeted environment meets all requirements. Please reach out to our support team.
- Preflight Check Warnings: If preflight checks return warnings, the installation can proceed, but it is recommended that you address these warnings to comply with our recommendations.
- **Install preflight **
curl https://krew.sh/preflight | bash
- Run the pre-flight check
helm template oci://registry.icedq.com/icedq/stable/icedq | kubectl preflight -
Install the application
Online Helm charts
helm install <release-name> --timeout 30m -n icedq --create-namespace oci://registry.icedq.com/icedq/stable/icedq -f local-values.yaml
Example Usage:
helm install icedq --timeout 30m -n icedq --create-namespace oci://registry.icedq.com/icedq/stable/icedq -f local-values.yaml
Offline Helm charts
helm install <release-name> --timeout 30m -n icedq --create-namespace icedq-<version>.tgz -f local-values.yaml
Example Usage:
helm install icedq --timeout 30m -n icedq --create-namespace icedq-2024.2.3.tgz -f local-values.yaml
Verify the installation
Upon successful installation, you should see the following output:
NOTES:
To access the Application use below URL:
https://app.icedq.net

You can get the first user credentials with below commands:

Username: kubectl get secrets icedq-keycloak -o jsonpath="{.data.APP_USER}" | base64 --decode && echo
Password: kubectl get secrets icedq-keycloak -o jsonpath="{.data.APP_USER_PASSWORD}" | base64 --decode && echo
These notes can later be retrieved with helm get notes <release-name>
If you opt to install an embedded database it will include the commands to get the database credentials as well.
Once all the pods are in running state, you can start using the application.